Michael McFadyen's Scuba Diving - Bare Island Deep Wall Drift
 |
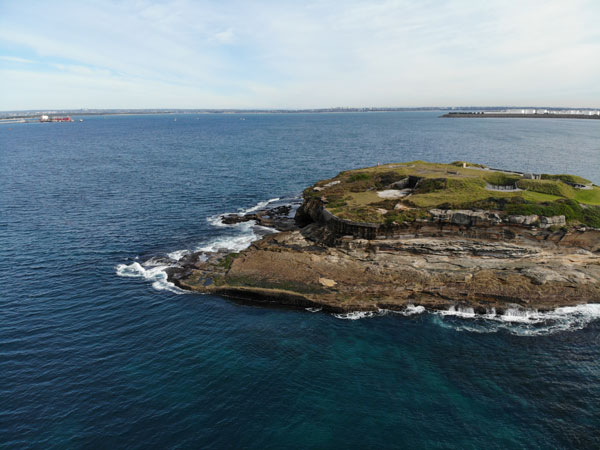
A panoramic photograph of Bare Island on a perfect day
This dive starts at the back left of the island and goes behind the island and ends on the island just to the right of the bridge |
In Sydney, this is probably in the top two shore dives that you can do. However, it is one that should only be attempted by experienced divers for a number of reasons that I will detail later. As you will be aware from my web site, there are many dives that you can do at Bare Island. One is Bare Island Deep Wall. In this article I will describe another dive that spends a lot of its time on the Deep Wall.
 |  |
A satellite photograph of Bare Island showing the reef
Entry point is far bottom right of the island | A map of Bare Island (Right)
Entry point is very bottom of the island
Click to enlarge |
Located 20 kilometres from the centre of Sydney, Bare Island is part of Botany Bay National Park. From the city, travel along Anzac Parade or Bunnerong Road to La Perouse. Upon arriving at La Perouse, park on the edge of Anzac Parade above the island as close to the island's access road as you can. Walk to the edge of the headland overlooking the island to check the water conditions as well as the entry and exit points. This dive can only be done in very calm seas. One thing that can affect the site is that after prolonged periods of very heavy rain, the visibility can be reduced to one or two metres.
To do this site you will need very flat seas around the island. If the swell is from the south or south-east and more than half a metre, then you probably could not do the dive as the entry point would be unsafe. The higher the tide the more dangerous it can be as the waves come right over the rock platform.
The tides have a very marked impact on this dive and you MUST have an incoming tide to do it. This will also give you better visibility. Do not do under any circumstances on an outgoing tide, as even a slight outgoing current will make it almost impossible to make your way to a safe exit point and you will end up out of air and in the middle of the entrance to Botany Bay.
However, you should be aware that sometimes, even on an incoming tide, the current can flow out on the Deep Wall in spots, although it should not be that strong to make it impossible to continue the dive. If it gets too strong, go up over the wall to a shallower depth and continue north.
 |  |
| A drone photograph of Bare Island from the south showing the entry point, the large flat rock area | Another drone photo of the entry point |
As mentioned above, once you have arrived at Bare Island, look out to the far left corner of the island from the headland above the bridge. If there are any breaking waves on this corner, then forget about this dive and do another of the Bare Island dives. If it is flat, gear up and walk across the bridge. Once on the island, walk to the back left corner. Keep close to the fort till you get towards the back and then cross over towards the corner.
The corner of the island can be covered in a green weed, so be careful as this will make it slippery. When you have your mask on, walk to the edge of the rock platform on the eastern side (not the southern side which is shallow and can have waves breaking even in calm seas) and put your fins on. The water here is deep so you can safely do a giant stride, but be careful anyway.
 |  |
A new underwater map of Bare Island created by Marco Bordieri from www.viz.net.au.
For a much larger pdf version of this map, click here.
Used with permission of Marco Bordieri | Information about the map at left and below |
 |
A new underwater map of Bare Island created by Marco Bordieri from www.viz.net.au.
For a much larger pdf version of this map, click here.
Used with permission of Marco Bordieri |
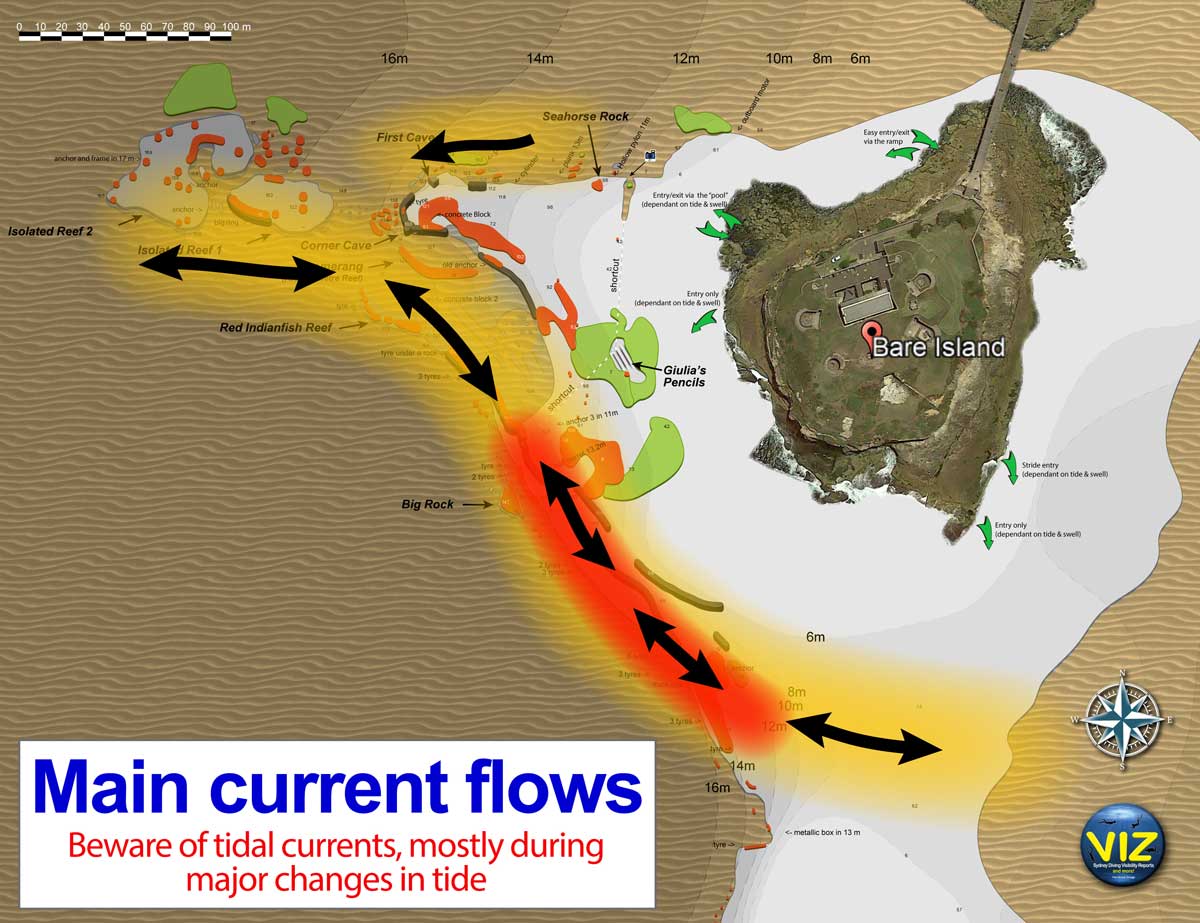 |
This shows the predominant tidal currents at Bare Island. Incoming are the currents to left, outgoing to right. Created by Marco Bordieri from www.viz.net.au using my information.
Used with permission of Marco Bordieri |
Once you are in the water, swim out about 15 metres towards the open sea before descending. When you are on the bottom, you will see that you are on reef with a lot of kelp around. The depth will be about 6 or 7 metres, depending on the tide. Head south and you will pass a couple of large rocks on your right. Keep going, staying just at the bottom of the small wall that sits up a metre or so. A bit further on you will pass some large boulders on your right. The depth will be about 8 metres.
Until you hit the deep wall, do not linger too much as there is a long way to travel. After a couple of minutes of heading almost due south you will notice that you are now travelling more to the south-south-west and after about five minutes the reef has gotten a little deeper and on your right the reef is no longer a lot shallower than you are. Soon you will be heading west and see a sort of gully. Head down this and you will drop deeper till you reach the sand at about 15 to 16 metres. It does not matter if you turn west too early, but do not keep going south longer than four or five minutes.
If you turn early, you will come up a bit to maybe six or seven metres and then start to drop off. You get to 10 then 12 and 15 metres. In the 15 metre area there are some nice sponges. You can quickly examine them but on most dives I ignore them. Soon you will see sand ahead. This is the edge of the island's reef and the start of the Bare Island Deep Wall.
Turn right and follow the sand edge. The depth will soon be 18 metres and it can get to 20 metres on a very high tide. You should have a nice current behind you so it will be an easy dive. However, at times we have had a strong cross tide, then a following tide and finally, a slight tide against us, all on an incoming tide. If it gets too strong against you, turn right and head up into the shallows and continue to the north-west. The deeper section of reef is one of the nicest reefs you will see in Sydney. There are lots of colourful sponges on the many rocks.
 |  |
| Two photos of the Deep Wall at Bare Island |
At first the reef on your right is relatively low and there is not much of a wall. The sand has some small rocks. Soon the wall on the right becomes quite high, about four to five metres. There are some very large boulders off the wall and in spots these create canyons between them and the wall. There are some overhangs and small caves here as well.
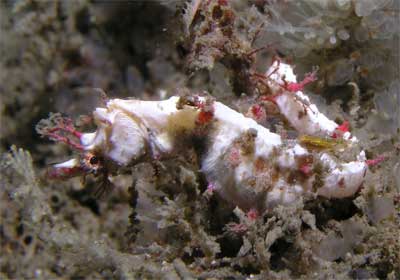
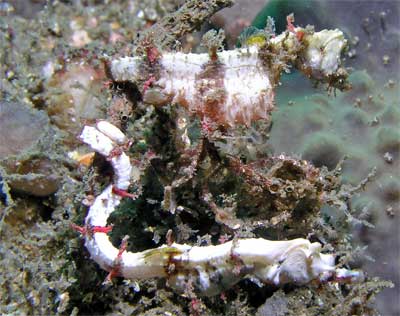
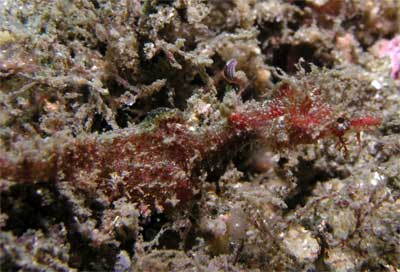
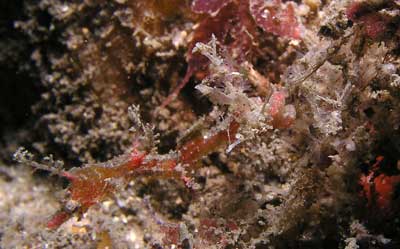
Look on the rocks for red indianfish. There are many living here, although they can be hard to see as they blend in very well with the sponges. Sometimes they might be on the sand. On 10 January 2008 when on our weekly night dive, we saw six red indianfish along the Deep Wall. Also look for sea dragons on the sand and sea horses on the sponges. If you have good eyesight, look on the reddy/brown weed on the rocks for pygmy pipehorses. These tiny animals can range from 5 to 30 mm long and can be a reddy colour or a red and white colour. See the photographs below.
Pygmy pipehorses are very hard to spot. Try looking low across a rock and watching for the weed to move. If anything does not move exactly in unison, examine closely as it is possibly a pygmy pipehorse. At night, you can often find when your torch highlights their eyes, creating a tiny glint of light back at you. In October 2008 I found two pygmy pipehorses in this area.
Continue along the wall. Do not rush, but also do not linger too long as the depth here (almost 20 metres) will mean that your air is being consumed at a good rate. On your first dive here, I would suggest going a little quicker, you can always do the dive again and go a bit slower the next time.
 |  |
| Pygmy pipehorse on Deep Reef | Two pygmy pipehorses on Deep Reef
The bottom one is the one in the photo at left |
After about 20 to 25 minutes on the bottom, you will come across a lot of boulders off the wall. The sand is about 18 to 19 metres deep. This is just south of where you meet the wall if you go to the Deep Wall from the western corner of the island and head south-south-west. The wall here is probably the most prominent section of the Deep Wall. Look around here for more pygmy pipehorses as we have seen many in this area. There are also often red indianfish and normally sea dragons here.
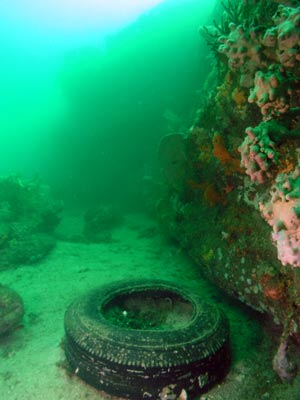
If you follow the rocks off the wall (especially in poor visibility) you will come to an apparent dead end. If you swim north-east you will strike the main wall again. There is a tyre here between some rocks. These rocks have also been home to pygmies.
Just past here the wall starts to become less prominent, being only two metres high and then perhaps one and a half. Follow the sand edge> There used to be an old Admiralty anchor just off the reef in this area. It was a good marker point, but unfortunately some idiots from a dive shop moved it (destroying part of it) to a spot near the end of this dive. The depth has come up to about 17 metres here.
Again, we have regularly seen pygmy pipehorses in this area.
You need at least 100 bar to safely get back to shore from here so make sure that you have at least this amount of air. If you get low before this, go up over the wall to the north-east till you hit another wall (variously at 8 or 15 metres) and follow this to the north or north-west.
 | 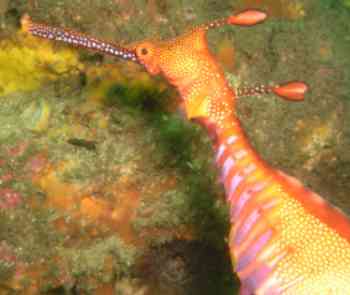 |
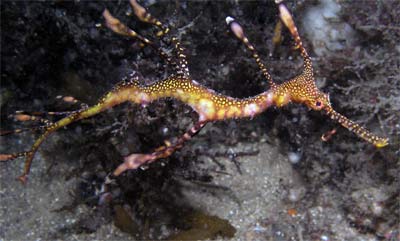
| Pygmy pipehorse on 15 metre ledge | A close up of a common sea dragon at Bare Island |
To return to shore, swim along the wall in a roughly north-westerly direction. When you see another truck tyre between a very large low rock and wall, turn right and head north across the sand. You will be going up a sort of "dry creek bed" or very shallow valley. Look for spiny gurnards in this area, especially at night.
If you have a lot of air left, you can keep following the deeper section of reef till it comes to another section of reef straight in front of you. We call this Red Indianfish Reef (RIF Reef). This is usually the best spot at Bare Island to find RIF. Cross over the reef which is flat and covered in sponges. Head west or north-west. When you near the end, turn right and swim over the sand in a north-east direction. You will soon see a concrete block about one metre square. Head north from here. You will end up as per the paragraph below.
No matter which way you go, after a minute at the most you will come to a smaller wall or ledge running at right angles to you. This is about 14 to 15 metres deep. In this area, look for pipehoses again. On 15 November 2005 my wife Kelly and Adam Florence found a few here. They were there for about two months. We have seen many here over the years since, as well as RIF. Check out this whole area. We call this 15 Metre Reef.
From here follow the reef to the left (west). After 20 metres the southern edge takes a small turn to the right before turning left again. After another 15 metres it again turns to the right and sort of stops. Along this section you can sometimes see sea horses. As mentioned, there are also sometimes red indianfish here, I have seen as many as three on this one section of reef on the one dive.
From here, in good visibility (20 metres or better) you will see the main Bare Island Reef off to the north-north-east. If you cannot see, just swim north and you will soon find it. Swim over and the depth will be back to about 14 metres. You should come across the overhangs near the corner (we call it Sea Horse Corner or Cave) this is the logical end of the reef if coming from the bridge as per Bare Island Right dive.
 |  |
| Baby pygmy pipehorse on Deep Reef - May 2006 | A baby sea dragon on the Deep Wall |
In poor visibility you will have to be a bit careful to ensure you do not keep following the 15 metre ledge across to the smaller rocks which takes you away from the main reef to the Bare Island Isolated Reefs mentioned above. Head north once at the corner and have a look in this area for sea horses (as I mentioned we call it we call it Sea Horse Corner or Cave). There were at least two here (November 2005 to May 2006) and I have seen up to six or seven. However, since late 2010 (till at least mid-2013) there are none. See the Bare Island Right dive for more information.
You will then pass two caves. Head out away from the first cave and there are some rocks and sections of reef that are home to some very nice fixed marine life and heaps of different nudibranches can be seen on the growth.
From here it is a matter of following the reef all the way back to the boat ramp on Bare Island (that is the opposite of the way you came out if you did dive 1 from the normal Bare Island Deep Wall dive).
This dive will take at least 55 to 60 minutes and up to 70 minutes. You will need good air consumption and should take a large tank rather than a small one.
FISHLIFE
As well as the fish mentioned above, you will see bearded cod, beardie, bream, cuttlefish, old wife, mado, stripey, red and blue morwong, maori wrasse, crimson-banded wrasse, mosaic leatherjacket, six-spined leatherjacket, silver sweep, smooth flutemouth, blackspot goatfish, white ear, mullet, sergeant baker, yellow-eyed leatherjacket, pineapplefish (knightfish), snapper, crayfish, abalone, octopus, prawns, shrimp, herring cale, crab, senator wrasse, Port Jackson shark, yellowtail, silver drummer and moray eel. This reef also has some of the most colourful sponge life you will see anywhere in Sydney. Fantastic colours!
WARNINGS
Things to be aware of on this dive are:
SUMMARY
A fantastic dive site, one of the best in Sydney. However, only for experienced divers (at least 100 dives) who are good on air consumption and navigation and who have dived the Deep Wall a number of times before or who have someone leading who has done this dive a number of times before.
We do this dive a lot at night and I have never failed to have an enjoyable dive.
|  v6.00.307 © 2003-2005

