|
Catlypso - Michael & Kelly McFadyen's Sailing Adventures
Once we purchased Catlypso and had it back in Sydney, we had a lot of work to do to bring her up to a standard that we would be happy with. When we made the deal to buy her, we knew that there were many things that needed to be changed or repaired. The price we offered reflected this.
On the way back to Sydney we broke a few things and found that some things just did not work. When we got home, we decided to spend part of at least one day a week on the boat. In addition, as I had retired, I decided to go out as often as the weather and my (busy) life permitted.
First, a recap on the boat itself. A more detailed description of the boat is here.
LIGHTWAVE 38 LAYOUT
The boat is a 38 foot (11.3 metres) catamaran which is 6.6 metres wide. The following is the plan of the boat.
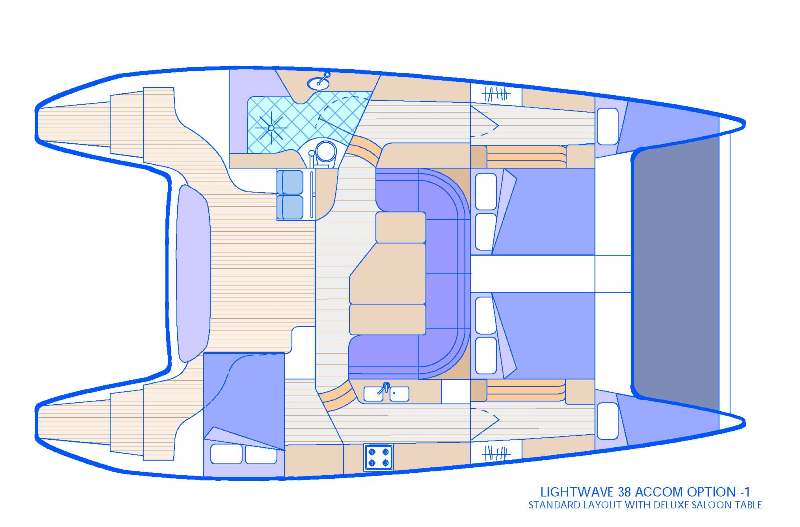 |
| A typical layout for a Lightwave 38 - this is exactly how ours is configured |
 | 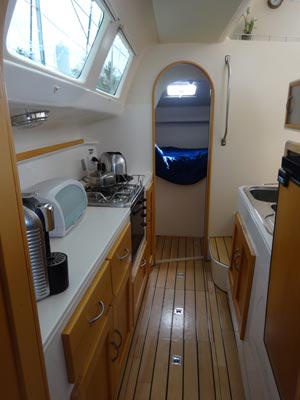 |
| Pieces of Eight (as she was called then) under power | The galley in Pieces of Eight |
CLEANING
Over the weeks after we returned, Kelly and I went to the boat a about once a week. I also went during the week, sometimes once, sometimes twice. When we went, Kelly concentrated on cleaning all the cabins as everything was dusty and mouldy. We also removed all the linen, doonas, pillows and outside cushions and took them home. We washed all these things and eventually returned them to the boat. This took a while as there was a lot of stuff and we needed to transfer them mostly via the small tender, although we did use our larger Marlin Broadbill a couple of times after we had been out diving (we took everything off the day we arrived home and were at the wharf).
Kelly not only cleaned the cabins, she pulled out all the crockery etc from the galley and cleaned the cupboards and drawers. She also discarded a lot of the crockery as we had way too much for cruising (we could use plastic plates from home if we had friends over for a day). There were even three frying pans, God knows why, when only one can fit on the stove. We also threw out plenty of plastic container lids as there were no containers to go with them. We also got rid of the toaster as we cannot imagine ever having 240 volt power that often to justify using it over the gas stove.
Kelly also purchased some new containers as well as some kitchen items we found missing (can opener, strainer, teapot, wooden spoons and more). The cleaning took at least 12 visits to the boat.
I also cleaned the upper compartments of both engine compartments. These had lots of diesel dust.
REGISTRATION ETC
Boat Registration
On about 12 June 2014 Kelly mailed off the application for registration of the boat to the RMS Parkes Office. On 7 July 2014 I phoned their enquiry line as we had not received the registration back in the mail nor had any money been debited to our credit card. They confirmed that they had received it but were sending it back. Why? Because Kelly had sent a copy of the HIN (Hull Identification Number) certificate rather than the original. Note that the form does not say to send the original.
When I questioned why over three weeks since they had received it they had not bothered to phone me or email me (of course this information was on the form) to ask me to send the certificate to them. Further, when I said I would mail it to them the reply was no, they are sending it back and I needed to resubmit again. Fuckwits is all I can say.
The next day I went to the RMS processing office at Miranda and submitted the form. As the boat was registered in NSW before (2006-09), they did a transfer and renewal. This was done in about 30 minutes, together with the mooring application (see below). The boat is now registered in NSW.
Mooring - Permanent
Of course one of the things that we needed to arrange was a mooring for the boat. The ones available via Roads and Maritime Services (RMS) are the cheapest but also the hardest to get. Their web site shows the areas where there are moorings as well as listing the number of people waiting and when the last mooring was allocated. Our preferred location was in Port Hacking. However, all the main bays had what appeared to be long waiting lists. When we were at the Sanctuary Cove Boat Show there were staff from NSW Roads and Maritime Services (ex NSW Maritime). They told us that if you phoned their service line you could find out more information about the queues for each location.
On 4 June 2014 I phoned RMS and found out that of the two locations we preferred, there were 12 applications for Yowie Bay with the one now at the top of the list having being submitted on 21 January 2014. For Burraneer Bay, there were only three on the list and the top one was applied for in April 2014.
Even though it looked like we could get one in Burraneer Bay in only a few months, we submitted an application for Yowie Bay as this was our preferred location. Yowie Bay is a bit more protected in my view. In the meantime, we would need to get another commercial mooring to use.
On 6 June 2014 I submitted an application to RMS for a mooring for Yowie Bay. I mailed this to their Parkes processing office. On 7 July 2014 I phoned to check as we had not had any money debited against our credit card for the application. Guess what, it was not found. Now I do not think that Australia Post lost our letter, I think RMS lost it in their system. On 8 July 2014 I went to the Miranda RMS service centre and submitted the form again. Luckily no-one had applied since May, so I am not further down the list than otherwise.
On 22 September 2014 I was notified that we were number 4 on the priority list for Yowie Bay and that 17 new moorings had been offered in the past 12 months. It sure looked like we would not have too long to wait for a mooring and this was correct. On 30 October 2014 we received a letter offering us a mooring. Next step was to contact RMS to find out where this is in the bay and arrange payment and also the installation of the mooring.
On 5 November 2014 I submitted the acceptance for the mooring at the local RMS office (Service First service centre). I was not sure what happened next as I do not know how to contact the local Boating Services Officer (BSO) who needs to take me out to show me the mooring location. Once this happens, I can then arrange for the mooring to be installed. It is a very convoluted process that is for sure. I will update this section as soon as I know more.
On 10 November 2014 I received a phone call from a person from the Sutherland RMS (Maritime) office asking if I was going to accept the offer of the mooring as the offer expired today. WTF! I returned the call (the call reached my message bank) which was very difficult as they do not give their direct number. I had to call the main number and ask for the Sutherland office but they refused to put me through there so I got put onto another location who then put me through. Very poor service, certainly not Service First. Anyway, I explained that I had submitted it almost a week ago. She undertook to contact me if she did not receive the paperwork.
Meanwhile, I did a Google search for mooring installers in Port Hacking. I found four, one of which was based on Sydney Harbour but said they installed here. I emailed two direct, another via a web site form and phoned the fourth. The first one replied the same night with advice of the weight of the mooring block, the chain and rope etc that would be used as well as a price. The second one replied the next morning with a price. The third one has still not replied (and to be honest, I doubt it will as I suspect the web site does not work properly). The fourth one said they were too busy on the Georges River and gave me the name of another one who he said he worked with. I phoned him and the price quoted was 50% more than the cheapest. I still have not made a decision and will not till I know where the mooring site is located.
On 14 November 2014 I received a letter from RMS which contained my mooring licence as well as details of how to contact the BSO. I phoned her that day but she did not answer, I assume she is off duty. I left a message. I had hoped we could fix this all up the next day as I went away for the next 8 days diving off Townsville. That did not happen.
Kelly and I finally got the chance to go out and look at the available sites on 30 November 2014. There was really only one suitable spot. This was where a large cruiser was currently moored. This was moving to a different location. The spot is on the eastern side of the channel coming into Yowie Bay and just outside the 8 knot area.
Anyway, the cost of the mooring for an 11.3 metre boat is $515 per year. There is also an establishment fee of $118. When you submit your original application, you need to pay $208. This is used to pay the establishment fee and the first $90 of the annual fee. Sydney Harbour costs considerably more, $1460 east of the bridge and $943 west (this also is the fee for Pittwater). I got prices for laying the mooring, these ranged from $1320 to almost $2000 for the same thing, all from reputable firms. I went with the lowest price and hopefully we will have it in by Christmas.
Mooring - Temporary
There are a few commercial mooring providers in Port Hacking. Kelly and I contacted them and got pricing and availability. The Royal Motor Yacht Club (RMYC) in Gunnamatta Bay did not have any for long term, but could supply one till 1 August 2014 (I suspect that this one is the mooring our friend Mark has used for years and which was temporarily vacant till his new yacht arrived on 5 August 2014). This was $300 a month.
Dolans Bay Marina had one for $330 a month, Yowie Bay Marina one for $275 and Burraneer Bay Marina for $350. Both the Dolans Bay and Burraneer Bay prices included the use of their communal tender to get out to the mooring but Dolans Bay was an additional $50 a month. I looked around and decided I could get a cheap small inflatable from Ebay for about $300 which would easily fit on my Prado. I also later bought a 2 hp Chinese Hyfong two stroke on Ebay for $298. It is a bit noisy, but it works okay so far, better than rowing out to the boat!
Therefore we decided to get a mooring at Yowie Bay Marina and I applied for this on 5 June 2014. The Yowie Bay Marina advised that all was okay and on the way back from the Gold Coast they told me the actual spot to use. This was to the north of the marina and boat ramp.
However, the moorings here were very close together and one day I got a phone call from one of the neighbours on the eastern side. He had noticed me there in my Broadbill and tracked me down via this web site. He advised that at low tide and in certain strong winds, our boat was hitting another one. I investigated and found that the boats were very close together at times (maybe two metres), they had not hit each other.
I attempted to shorten the mooring chain when diving one day but was unsuccessful. We shortened the lines we were using and this solved it to an extent. On 15 August 2014, the marina moved the moorings as a result of RMS deciding to implement changes in the locations of most moorings in this area. Our mooring was moved to the north-west. When we returned from Bali on 31 August 2014, we went to the boat and saw that this is a much better location, with nothing appearing to be too close now.
REPAIRS
Radio CD Player
Meanwhile, I attempted to fix the AM/FM radio as this for some reason never worked once we took ownership of the boat. It did work before, but despite many attempts, I failed to get it going. I then purchased a new one from Aldi for only $79. The installation of this took me ages as the wiring to the speakers went through an amplifier. As this also was not working (I assume the power came via the radio), originally decided to completely rewire it, but I soon discovered that it would be a lot of work to push/pull the new wiring through from the radio to the four speakers.
In the end I decided to use the existing wiring. I cut the wires are the plugs into the old radio and into the amplifier. I then soldered the new connector plug to the wires and then soldered the wires that originally went into the amplifier to the ones that came out of it. Luckily, I was apply to correctly guess which wire went to which speaker so that it all worked okay. I finished this on 3 August 2014. We now have a radio cassette with bluetooth and USB connections. No more dull working days.
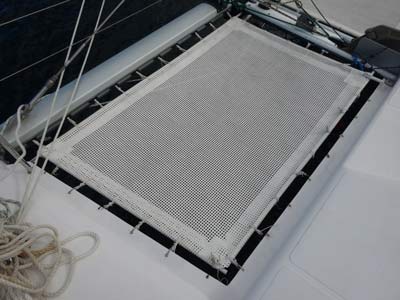
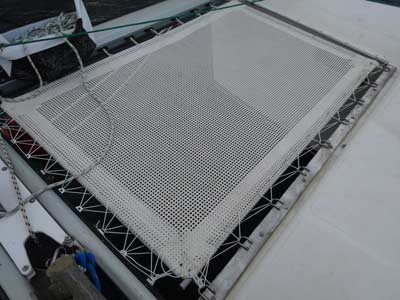
Trampolines
The trampolines at the front when originally fitted were done poorly. They were attached on the outside and rear to the boat itself. At these locations, the boat consists of two sections which join here, the hull itself and the deck. These are about 10 mm thick. The trampolines were attached via small D-shackles with the pins through the deck.
Unfortunately, the holes for the pins were only about 5 to 7 mm from the edge. This meant that when pressure was applied to the trampoline (either via people on it or seas coming up from under), the pins simply ripped out through the fibreglass. When we purchased the boat, it was obvious that this had happened before as there was evidence of repairs. There were also a couple that had ripped totally or also totally out. On the trip back to Sydney, the entire trailing section of the port trampoline ripped free.
The trampolines also have a border made out of plastic electrical conduit. These are in sleeves and tied together where they abut each other. Most of them were broken, so I purchased some more conduit and replaced each one. I am not sure that this will last as I really think that it is not strong enough. I will see what happens.
 | 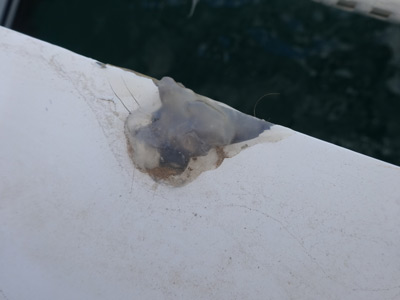 |
The port trampoline, you can see the broken
parts top right and bottom right | One of the holes torn in the fibreglass on
the trailing edge of the port trampoline
- I have filled with resin but not yet sanded back |
I used fibreglass resin and repaired the damage caused to the deck by the port trampoline fixings. I also measured these so that Kelly's Dad, Tomas, could make us some stainless steel parts to replace the existing fixings. The plan we came up with was to have flat strips of stainless steel on the top, with stainless loops welded to this. We will attach the trampoline to the loops via cord. These will be held in place via some bolts with big square washers and locking nuts underneath. We also had a resin between the plates and the boat. The holes will be about 25 mm from the edge, thus giving a lot of "meat".
On later trips, I removed all the D-shackles from the two rear sides and filled the holes with resin. I will do the rest of the outside ones once I have the new fittings and installed the rear ones as I do not want to leave the trampolines only attached by two sides. This could not happen till mid-September as Tomas went to Cape York in August 2014.
I also purchased some replacement sail slugs, as this is what is used to connect the trampoline to the hull on the inside edges. Some of these had broken before we purchased the boat and a couple more snapped off on the trip down from Queensland.
On 6 September 2014 I worked on this. I added more slugs (now 10 each trampoline rather than the six before) to try to lessen the pull on each slug. I also replaced the cord that connected the slugs to the trampoline. Instead of individual cords from each slug straight to the trampoline, I put a zig-zag of cord from one slug to the trampoline then onto the next slug etc. I also did this twice in a different pattern. Hopefully this will mean that any strain is put on all the slugs rather than one as now.
In addition, the cord is a bit thinner than the old stuff. My idea is that this will be the weak point in the system, with the cord breaking rather than the slugs or the other fittings. Also, rather than have four or five strands of the cord from the trampoline to each slug, the lesser number will also mean it is a weak point.
 | 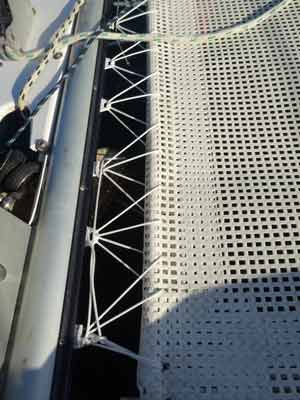 |
The new stainless steel strip in place on right and two cords
connecting it to the trampoline. Compare to photo above. | The additional sail slugs and the new cord |
On 14 September 2014 I installed the two longer sections of the stainless steel strips that Tomas made. I drilled the holes through the fibreglass and then put a two part resin along the section where the stainless plate sits. I then placed the strips in place and bolted them in using seven bolts. I connected the trampolines to the strips using cord on 16 September. I ran two separate cords through the stainless loops in a similar pattern to how I did the inside slugs. In late November 2014 I added another cord.
On 17 September I went to install the two stainless plates on the outside parts of the trampolines, but after drilling the holes I realised I did not have enough nuts to complete one, let alone both. On 20 September I did the port one but the starboard one could not be done as the square washers Tomas made were too big. This is because the fibreglass overlap on this side is only 40 mm whereas on the port side it is greater than 60 mm. It is my fault for not explaining this better to him. That day I took the washers home and ground down one side of each so they will fit.
On the October 2014 Long Weekend I replaced the cord on the front sides of both trampolines. Like the other sides, I ran three zig-zag lines from the sail slugs to the trampolines for each one.
There are now three separate cords for each side of each trampoline.
Engine Compartments
I also removed the stainless steel frame from the port engine room that holds in place the floor above the engine. The outside half of this was not only warped, but it was installed badly in the first place. Like the trampoline fittings, the screws holding it in place barely went into solid fibreglass, especially along the outside edge.
Tomas welded small tabs on the frame so that I could reattach with screws further from the edge. However, this failed as the fibreglass floor is very thin and the screws did not hold. I eventually replaced the four screws on this side with 6 mm bolts and washers and locking nuts on the underside. This worked. I also replaced four other screws on other parts of the frame with the same bolts.
Both the engine compartment and the upper compartment needed a good clean. I cleaned the upper compartments of both engines in early September 2014.
While we were away in 2015, the starboard engine compartment had the same problem as the port one. I temporarily fixed it by using some 100 x 20 mm boards to take the weight off the floor. When we got home, I took the stainless frame out and Tomas welded tabs on it. In January 2016 I reinstalled.
Water and Waste Systems
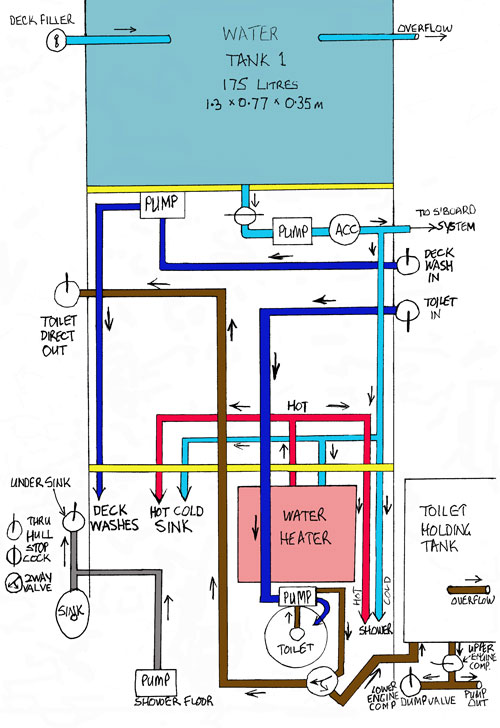
I also drew up diagrams of the boat's water, sewage and drainage systems. It was very frustrating not knowing exactly what each sea-cock was for and how the systems worked. Once I had this all worked out, I put labels on each hose, sea-cock etc, including direction of flow.
Using the diagrams, I made up laminated diagrams of the setups for each hull and attached the appropriate one under the floor hatch that gave access to the hull where they were located. However, I am still not convinced that i have them exactly right, as some parts of the systems are not visible to me so I do not know how they connect to each other.
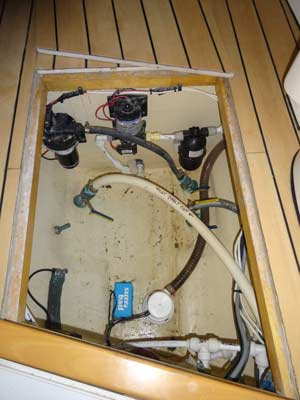 |  |
The underfloor at rear of port hull - most of
the inlets and outlets on this side are here | The diagram for the port hull
Click to enlarge |
I also measured the freshwater tanks (there are three) and worked out the capacity. This appears to be close to the advertised 450 litres. I also worked out how to isolate each tank from each other (there are three). This will be especially handy once we are travelling and when we may need to use water that is less than 100% pure. The tank on the port side uses its own pump while the two starboard ones share a pump.
Toilet System
One thing I still appear to have not worked out properly is how the toilet system operates. I had thought that I had it all working, but it appears not as the alarm for the holding tank is sounding, indicating that it is full. However, I was convinced it was empty. I will need to spend some more time investigating it but there is not much on the internet about how this works. In the meantime I have disconnected the alarm.
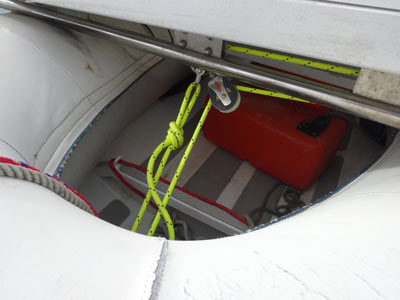
Tender
On one trip out to the boat I removed the outboard motor from the tender. This was difficult on my own, but I managed using one of the winches and a rope so that it could not fall into the water. I took this to the shore using our little tender and got my outboard mechanic to look at it. Since we purchased the boat it has not worked, apart from one brief split second when it kicked.
The problem was that the fuel tank had very old fuel in it. This really smelt bad, not even like fuel. The fuel then had got into the carburetor and clogged it up. In addition, the spark plugs had the wrong gap when we tried to get it running in Queensland. Anyway, when he looked at the motor, he found that the carburetor was full of "varnish". This is what happens when the old fuel evaporates and leaves behind a residue. He cleaned it and the spark plugs and got it back working perfect. The cost was only $100.
On 1 August 2014 I towed the tender back to the boat ramp with our little tender and attached the motor to it at the wharf. This was a lot easier than doing it at the boat. The motor started after a couple of pulls and ran beautifully. I used it to get back to the yacht, towing our little tender. Of course now I need to register it as in NSW you must have your tender registered. More money!
As I think I mentioned in the previous page about purchasing Catlypso, it is not an easy thing to register a boat in NSW that was previously registered elsewhere (or that matter not registered). The tender was not registered in Queensland as it did not need to be. However, in NSW virtually everything must be registered. Even if it was registered, the same very complex, time consuming and expensive process has to be followed.
First, you need to have a bill of sale for the boat. Of course, we do not have a specific one for the tender as it came with the yacht. I hope that this will suffice. Second, you need to have a HIN (Hull Identification Number) on the boat. This we have. Thirdly, you must have a HIN Certificate. This is a real pain to get. It costs $82 and there are only a limited number of companies that do this.
To make it worse, while there are three companies listed on the RMS (Roads and Maritime Services website) based on Port Hacking, the truth is there is only one. One appears to have gone broke, then other said he had no-one certified to issue the certificates and also was so busy for the next three months he would not do anyway. The other one was not answering their phone when I tried to ring. It later turned out that they do not appear to work full time.
There are other companies which are "land-based" but this represents a further difficulty for yacht tenders. How do you get the tender to the company? Of course, we do not have a trailer for it. You can get some of these companies to come to you, but they charge at least another $100 on top of the $82. In the end I got onto the water based company and made arrangements to have the tender inspected.
On 26 September 2014 I drove the tender (illegally of course) from Yowie Bay around to Dolans Bay (about six kilometres). The owner checked the HIN plate and issued the certificate. Unfortunately, I did not have enough cash to pay him and he does not take credit cards! I had to come back the next day when returning from a boat dive and pay the rest and collect the certificate.
On Monday 29 September 2014 I took all the papers and the application form to the RMS office at Miranda. I was there when it opened and was second in the queue for the maritime processing. Once I was served it took a little while to process the application, but the officer did it as quick as she could. I did not encounter any problem with not having a bill of sale for the tender, I just used the one for the yacht and added the inventory. I handed over $72 for the rego and $20 for vinyl numbers and we now have a registered tender!
 | 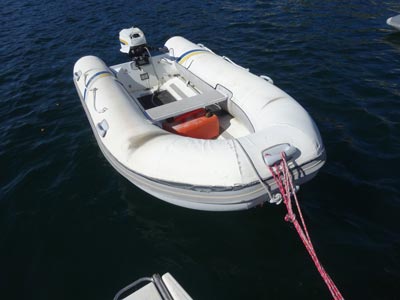 |
The new ropes and additional pulley
on the starboard side of the tender davit | Our tender |
Another problem was that the system for raising and lowering the tender from the davits was very poor. There was only a 1:1 redirect in place. Even using the traveller winch, it was hard to raise. It was also dangerous to lower, as proven by me ripping heaps of skin off three fingers of my left hand when I attempted to lower it in Queensland.
I purchased two pulleys and placed one on each of the two lines (one to bow, one to stern). This gave a 2:1 mechanical advantage. I also replaced the existing ropes with one of the replaced halyards as the old rope was in very poor condition. However, this was still not working perfectly as the rope slipped through the loop at the winch end meaning that the stern (the heavier end) of the tender did not get pulled up at the same rate as the bow. I ended up using a knot to stop the rope moving through the loop, but this was not working as well as I had hoped it would. I then used some large cable ties to lock the rope to the loop. This appears to be working.
I also needed to make it easier to attach and detach the stern lines as it was very tight. I added a small D-shackle to each side and now it is easy.
I also made some safety lines for the tender. I used these to secure the tender and stop it rocking forward and aft.
I also created a new mooring line for the tender (again the old one was very bad) using some halyard rope but as this sank, I later changed it to silver rope. I also found in the main anchor locker a small stainless steel reef anchor. I brought some chain and 15 metres of anchor rope from home (stuff I have found while diving) and made a new anchor rope.
As we are going to use the tender for diving, I also made a "mermaid" line (a safety line) and some ropes to hang over the side to attach our dive gear to before we get back on board the tender. I also made a safety stop line.
The tender also had a slow leak in the bow chamber. This required minimal inflation after about four to five days. I attempted to find the cause of this late in 2014 and early 2015 but failed. A few weeks after we started our trip in May 2015, I found the leak when I was in the water swimming and heard it leaking. I repaired the small hole and it never leaked again (as of early 2016).
Mooring Bridle
We also did some adjustments to the mooring setup in the week after we arrived home. This was because of the problems we had in Port Stephens and later as there is no system for mooring.
After a lot of thought, we also worked out a new setup which we needed to get made. On 31 July 2014 I found a place in Melbourne via the internet that makes all sorts of ropes to order. It is called Melbourne Rope and Splicing. We decided to get one 4.4 metre long rope (20 mm Australian made double braid polyester rope) with stainless eyes at either end. This will be attached via D-shackles and clips to the existing bridle eyes.
The other, a backup, will be 6.2 metres long (the same rope as above) with soft 300 mm soft eyes at either end. This will attach to the bow cleats. The total cost to be made and sent to Sydney was $273. The company was very responsive to my emails. I placed the order for on 4 August 2014 and they arrived just after we came back from Bali in late August. I also purchased some large D-shackles and clips for one of the bridles.
By 14 September 2014 we had installed both, much better than what we had. After experiencing the moorings in the Whitsunday Islands, we need to get another longer one made so we can put it through the loop under the bouy rather than at the end of the line.
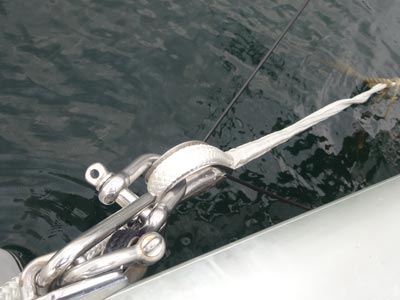 | 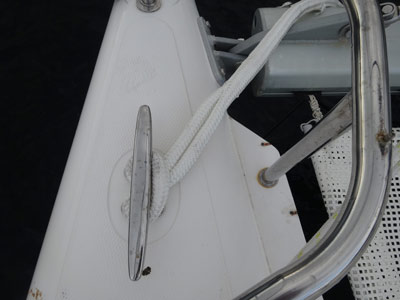 |
| This is the main mooring bridle for when we use a mooring. | This is the end of the backup mooring bridle
which we will probably only use on our own mooring |
VHF Radios
The boat came with three VHF radios. One was the main ICOM IC-M402 and the other were portables, an ICOM IC-M2A and an ICOM IC-M72. Each of these had a problem.
The M-402 is a DCS (digital select calling) model and worked perfectly, but the remote handset which attaches to a plug outside at the helm did not appear to work. In addition, the cable for this was crumbling, presumably from UV damage. I had previously tried to get it to work, including plugging it directly into the back of the radio. I had sprayed the plugs with WD40, but this did not seem to make any difference. I gave it to a friend to look at. He loves tinkering with electronic stuff. He advised that the wiring in the cable appeared okay, meaning that this was not the problem. He could do no more as the inside of the handset was a circuit board.
I took the handset back to the boat and tried it again. This time it worked. I think it may have been operator error before. At the time I thought that you needed to turn on the radio first and then also push the power button on the handset. However, as you will see shortly, it was more than this.
I was able to contact Marine Rescue Sydney from the helm. I gave it back to my friend and he changed the cable to a new one. This cost about $45 and it all worked great. However, when I tried again on 4 October 2014 it would not turn on. Back it went to my friend who checked that everything was okay! On 21 October he came out to the boat with me. Again, it would not work. We tried a few things and then discovered that the handset has to be plugged into the radio before the radio is turned on. Once this is done, it works. What a stupid feature and it is not even mentioned in the manual! Again, I called up Marine Rescue Sydney and could speak to them successfully.
I later got a radio licence and then applied for an MMSI number. I then programmed the VHF radio with the MMSI number so that the emergency system worked correctly. I finally used the DSC feature on the way back from northern Queensland, it worked perfectly.
On 4 November 2014 I connected the Garmin GPS to the VHF radio. This means that the GPS sends location details via NMEA0183 to the radio and the radio can then use this when an emergency call is sent. It also permits the radio to send our location when requested via DSC.
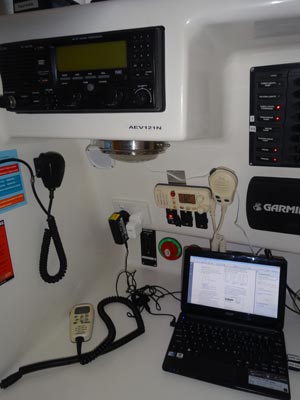 | 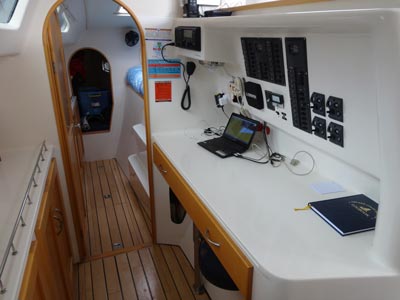 |
The HF radio top left, the VHF centre and laptop below
Bottom left is the remote VHF handset, of course not in use here | A wider view of the chart table and electronics |
The portables had battery related problems. Both worked okay, but the IC-M72 (the newer of the two) had a broken charger. One of the two tabs where the power connected to the radio's battery was broken. As this was stainless steel (obviously a poor quality), it could not be repaired by me as you cannot solder stainless. I found a place in Brisbane which had one for sale for $69 delivered. This fixed this problem.
The IC-M2A would not hold a charge. I searched on the internet for a new battery. The only places I could find were in the USA. When I found one at a reasonable price, they would not send to Australia. Where they did, the freight charge was ridiculous, over $100, meaning the cost would be about $160 to $200!
I pulled the battery apart and found that there were two wires that were loose. Again, the problem was that they were attached to stainless steel, so it was not possible to solder a new wire in. I gave it to my friend who also could not repair. However, he did find a place in China via Ebay (which I had previously searched) which had the battery pack BP-224 for sale for $43 delivered to Australia. I ordered one of these and when it arrived the radio worked perfectly.
I also noticed that the frequencies on both of the portables was set to USA frequencies. The USA for some reason has some channels that are not duplex, so I had to download the manuals to work out how to change. All seems to be working okay now.
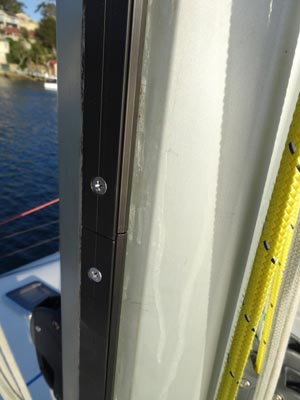
When we were putting on the new head sail, we had to pull it out to check that it was working okay. When we did this, it flapped a bit and as I walked back along the starboard side, something hit the deck and then a bit bounced over the side. What was that I thought? The main part that fell stayed on the deck. We picked it up and found that it was the bottom section of what appeared to be a VHF antenna. The bit that flew over the side was the top section which was held in place by a hex screw.
A few days later the sailmaker went up the mast and replaced it on the spreader. It seems that it had worked loose over the years. I had noticed that the day before the VHF reception was not as good as normal, but I put it down to the fact that it was raining and there was thunder and lightning around. He also advised me that there was an identical base on the other side of the spreader which was not as clean as the one where he replaced the antenna (I now actually think these are AM radio antennas).
Before replacing the antenna, I photographed the bottom of the antenna so that I could get a couple of new antennas. The plug turns out to be a UHF plug (used also on many VHF antennas) and also known as a PL-259 plug. I went to all three boating shops in the area near us and only one had an antenna that matched. However, it was 2 metres long, way too big I thought. I searched Ebay and found a few smaller ones and ended up ordering two from a seller in China. The cost was $65 each. They arrived mid-October 2014 but as of mid-November 2014 I have not installed as I need Kelly to be there to help me climb the mast. I did early in 2015.
HF Radio
We have an ICOM IC-M710 HF radio in the boat. However, when we were travelling back from Queensland, I was not been able to receive any transmissions from it. It seemed to be working in that it transmitted and received (according to the squelch and transmit indicators on the screen). What appeared to be wrong was the speaker was not working, so no sound came out.
The manual and some forums stated that if you connect pins 3 and 4 in the microphone jack, you will get noise from the speaker. When I did this, I got nothing. Therefore, it confirmed that the speaker is faulty (or not connected). I really do not want to open the radio up, but I may do this much later.
On 7 August 2014 I realised that there was a cable plugged into the rear speaker hole. I knew the hole was there, but not that there was a cable. At the other end this had a plug that would fit into my laptop. I then recorded the output from this as I changed channels and adjusted the squelch. When I play it back, there was sound, including some very faint calls. The next day I purchased an external speaker from Jaycar ($25) to connect to the radio.
This had a small plug on it but there was a larger correct sized one in a box labelled "HF radio" in one of the cupboards. I cut the wire and connected it up. Success! I could now hear the radio. I tuned to one of the weather channels and at 12:30 pm I successfully listened to the weather. I changed channels a few times and found another frequency that was extremely clear.
On 30 November 2014 I programmed the Pacific Seafarer's Net frequency (14.300MHz) into a channel and listened at 0300 UTC (1400 Sydney time). I heard the roll call about 1420 and when there was a gap, I called them. The operator was based on the west coast of the North Island of New Zealand. This is over 2,100 kilometres away! I could hear the operator quite clearly but he could not, at first, understand me. After a few goes he could understand me and said the transmission was very clear. Perhaps we had turned around, I did not notice.
We now have a working HF radio!
Sails
When we purchased the yacht we knew that the mainsail and headsail were not in the greatest of conditions. Before sailing back from Queensland, I had the headsail repaired as it had a small tear in it as well as degraded UV covering on the trailing edge.
Unfortunately, on the first day out of the Gold Coast, the main sail tore. These are carbon fibre sails and appear to be 10 years old. This is well past their expected life, although I would have thought that given the little use the yacht has been put to over its life they might have lasted a bit longer.
On 2 August 2014 we went to the Sydney International Boat Show. Two sailmakers had stalls there. We spoke to both and while they gave us a lot of information, one appeared to be not that interested in our business. The other one was proactive, taking our details and promising to send a quote. We received this the next night, excellent service. This was Chris McMaster, Managing Director of Doyles Sails Australia.
We were given a number of options for sail material, as well as two options for the headsail (overlapper or self tacker). The price also included a discount for purchasing within a week of the show. I also used the web site of North Sails to request a quote for new sails. Guess what? Over two months later as I write this, no response whatsoever apart from an automated email response!!! How shithouse is that for service?
We decided on 7 August 2014 to order the sails from Doyles. These are made in New Zealand. We have also decided to install a new sail track system. This will be the Harken 22 mm A Battcar system. The existing main sail is very hard to haul up, even using the winch. This will make it much easier. In addition, the existing system seems to have a inherent fault as the top two cars have broken and there are plenty of broken cars in cupboards in the boat.
The next day Doyles sent out a bloke who measured the sails. I paid the 50% deposit, so it is all underway.
The pricing was as follows:
I received the track and kits on 4 September 2014 and we made plans to install the new track ourselves on the next weekend. The sails are due to be installed on 17 September 2014. Kelly removed the main sail on 13 September 2014 while I was out diving. When we came back from diving, I used Le Scat (our Marlin Broadbill) to collect the sail (and a spare and the sail cover) and take them home on the boat.
 |  |
| The new mast track in place | The new sails |
On 14 September 2014 Kelly and I installed the new track on the mast. The track comes in sections of just over two metres. These are installed at the bottom of the mast and then pushed up so the next one can be installed. They are connected to the existing track by slugs. You do not tighten the slugs up totally as this means the track cannot move up to let the next one be installed (the screws into the slugs have Loktite on them).
The process was not too difficult, but it was a bit hard pushing the track sections up the mast so the next section could be installed. In the end, we had connected a piece of rope to the main sail halyard and then winched it up. It took about three hours to install the seven sections.
On 17 September 2014 the sails were delivered by the sailmaker's employee. He installed them (with my assistance). However, we lost overboard one battern and also some ball bearings were lost from the top car as it was difficult to install. We used ones from the bottom car. On 19 September he came back with the batten and extra ball bearings. On 13 October 2014 he came and installed the mainsail bag. Excellent service from Doyles, especially Andrew.
Wind Generator
The wind generator is, well, not generating! On 4 November 2014 I disconnected the wires that run from the generator through the upper starboard engine room and tested if the generator stopped when I shorted out the positive and negative wires. It did not, so this indicates that the problem is in the generator itself.
I will tackle this later in 2014 or early 2015.
Lights
When we purchased the yacht, all the lights were either fluorescent or halogen. The fluorescent ones are fairly efficient, so we will leave them as they are. However, the halogen ones use lots of power. Before leaving Queensland, I replaced the two spotlights in the cockpit that shine on the transoms (starboard side also lights the barbecue). These were MR16 downlights which were about 35 watts. I got two LED globes from Bunnings and after a bit of effort (they were a bit bigger) installed them.
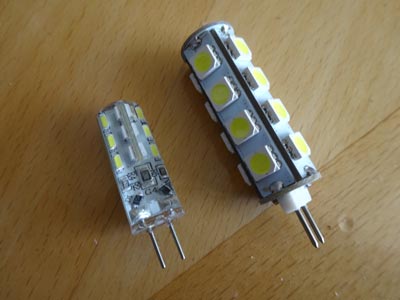
In the cockpit, there are three lights on the trailing edge of the roof. These were two pin halogen globes. In each cabin there are two reading lights and there are also two identical lights in the main lounge. They use the same globes which appear to be about 10 watts. I found a seller on Ebay who had two pin LED globes which are about 2 watts. I purchased 10 for $24, but when I got them, I found that they were too big for the reading lights. I then found another globe on Ebay which was shorter, so I purchased 10 of them for $20. I put these in on 7 August 2014.
 |  
|
The first type of LED globes I bought on right
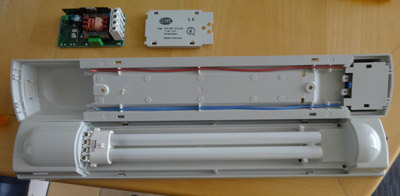
and the second type on left | The top photo shows the front and back of the lights.
Top left is the ballast which comes out of the hole below.The bottom photo shows the finished product without the diffuser. |
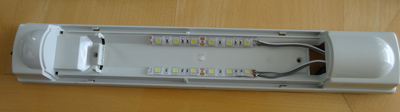
I also decided to upgrade the fluorescent lights on the boat. There are ten, one in each cabin, two in the main cabin, one in each of the galley navigation table, each bow and finally one in the pantry (between galley and double cabin). Currently most of them draw 11 watts, although the ones in the bows and the double cabin are different and only draw 8 watts. You cannot just replace the tubes with an LED setup, as the way they work is different (fluorescent lights have ballasts).
I found that some people have removed the ballasts (these regulate the current) and then connected LED strips to the 12 volt power. On 13 October 2014 I tested how this works by converting one of the main cabin ones. All I did was remove the tubes and the electronic part (which includes the ballast) and soldered in a small section of LED strip I had left over from my car. This had nine LEDs.
When we went out overnight the next weekend, we checked to see if this was bright enough. It was, so I purchased five metres of LED strip off Ebay (from Melbourne, only $17 delivered). I converted all the smaller lights in early November 2014. I ended up putting two strips of six LEDs in most of the smaller lights (that is 12 LEDs each). For the lights in the smaller one in the galley and navigation area I put two strips of nine LEDs (18 LEDs) as I figured we needed more light there. The LEDs draw is 14.4 watts per metre. Therefore, the 12 LEDs are 2.8 watts and the 18 LEDs are 4.32 watts.
I did not end up changing the three larger lights as they are of a different design and I could not work out how to do without a lot of effort and probably some additional cost (as the switch appears to be integrated in the ballast module).
How to Convert Hella Fluorescent Lights - 2JA 007 373-061
Cabin Doors
Both doors to the port and starboard cabins are not able to close due to them having expanded (I presume) over the years. We will need to take them off and plane one or more sides. I will get around to this in September or October 2014.
Radar
We have a Furuno 1715 Marine Radar. Although the radar works, the calibration was out. This meant that when a ship passed (say) straight ahead of us, it showed on the radar as being about 10 degrees to port. Fixing this was a simple matter of reading the manual and then, when an object was found that was straight ahead, adjusting the radar to match. However, it was still a little bit out and I on 17 September I think I fixed it.
 |
The Furuno radar centre, TV top and
AM/FM radio below radar |
Speed Instrument
We have a Raymarine ST60 Speed Instrument. This uses a small "paddle wheel" device located in the forward starboard hull to work out the speed of the boat. However, on our trip down from Queensland it constantly read well under the GPS speed. While some of this was probably (certainly?) due to a current, even when running into an incoming tide it would read less than the GPS. Therefore I believed that it was reading low.
I read in the manual that there is a way to calibrate this. On 4 October 2014 when we spent a few days on the boat on Port Hacking, I changed the calibration and then motored for a distance both up current, down current and across current. I compared the GPS with the ST60 and I think that I have got it as close as I can. I may later check it again later and change the calibration if I need to.
This instrument is linked to the wind instrument by a SeaTalk 1 cable.
Deck Shower
There is a freshwater deck shower on the starboard transom. This was missing the shower head and the door is partially broken (the top hinge has snapped). In mid-August 2014 I found the missing head in a cupboard. I glued it back in and tested. It squirted water a bit so I added some more glue to the surrounds and now it works perfectly. I will also have to glue the hinge back together when I get a chance.
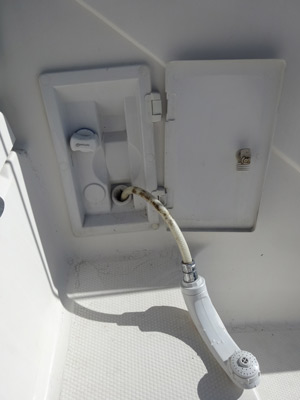 |
| The deck shower - note the broken top hinge |
Wi-Fi Router
The boat came with an Ericcson W25 Fixed Wireless Terminal for WCDMA/HSDPA
Mobile Networks (see photo under the AIS section below). This does a number of things. First, it lets you set up a wireless or wired network for computers. Second, it lets you connect to the internet using a mobile phone/data SIM card. Thirdly, you can attach a normal phone to it which lets you make and receive phone calls. Finally, you can attach a fax to it.
When we first purchased the boat I attempted to get this working but failed. On 10 September 2014 I decided to have another go. I connected a laptop to the terminal via a network cable. This failed for a reason I could not work out. I rebooted the laptop and tried again. It worked. Like other routers, you connect via an IP address and this gives you a log-in screen to a set up page. Once I connected, I set up the wireless part of the router, giving it a name and a password. I successfully connected to it via my laptop and my mobile phone.
I could not test the data/phone part as I did not have the required adapter to enable me to install my micro SIM in the router. On 16 September I put my phone SIM into the router. It connected successfully to the mobile network, but I could not get onto the internet. The next day I added the required code to the part of the setup and it connected to the internet.
I also connected a normal Telstra home phone to the router and successfully made a phone call. However, I think that running it uses a fair bit of power, so it is probable that we will only use when we actually want internet access (I later converted it to run on 12 volt rather than 240 volt as set up when we purchased it).
Click here to read next part of this article.
For information on repairs after 1 December 2014, go to this page. |  v6.00.307 © 2003-2005

