Michael McFadyen's Scuba Diving - Bare Island Bombora
On the northern side of Botany Bay, just to the south of Sydney is Bare Island. Bare Island was first described by Lieutenant James Cook while he was in Botany Bay in April 1770. He described it as:
... a small bare Island which lies close under the north shore.
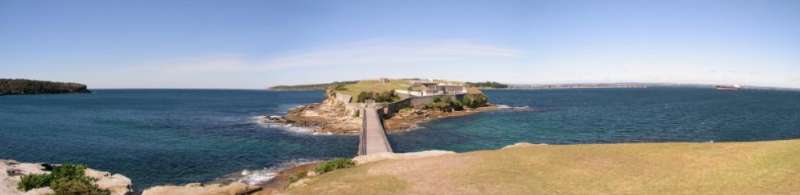 |
| A panoramic photograph of Bare Island on a perfect day |
The local Aboriginal tribes of Gweagal and Kameygal are almost certain to have given the small island a name, but it has not survived through to present time and is not even known now to the locals.
The island has certainly changed since those tranquil days. In the 1870s the people of Sydney had the view that the Russians were thought likely to invade Australia. Therefore, in 1877 two British fortification experts, Sir Peter Scratchley and William Jervois were sent to Australia as a result of a request from the Colony of New South Wales. They were given the task of designing and co-ordinating the defence of Sydney and they planned a series of forts and gun batteries to protect against attack. Bare Island was planned as the sole defence of Botany Bay. The fortifications on the island were built during the period 1881 to 1889 under the direction of the Colonial Architect, James Barnet. The barracks were completed in 1891. It became apparent that the fort and barracks had been subject to substandard workmanship and this led not only to the resignation of James Barnet, it led to a Board of Inquiry and then to Australia's first Royal Commission.
 | 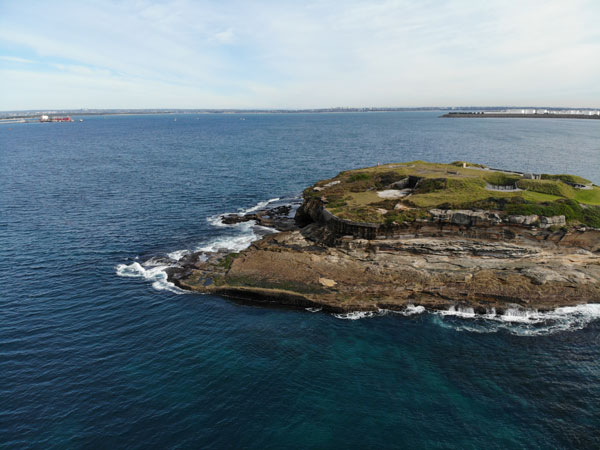 |
| A drone photograph of Bare Island from the south showing the entry point, the large flat rock area | Another drone photo of the entry point |
For more information about the Bare Island Fort, see the NSW National Parks and Wildlife Service Web Site.
Joined to the mainland by a small timber bridge, Bare Island is perfect for either day or night diving in almost all weather. In even moderate seas you can safely dive in almost any spot and in very heavy seas you can usually dive the protected side of the island. A number of different dives can be done around the island itself, as well as along the shore on either side of the bridge. These include Bare Island Left, Bare Island Right and Bare Island Circumnavigation.
When diving here, beware of small boats and jet skis which regularly speed under the bridge, taking no notice of dive flags. When ascending at the end of a dive in the channel, make sure you listen before leaving the bottom.
 |  |
A satellite photograph of Bare Island
The bombora is where the white water from
the waves are breaking at bottom left | A map of Bare Island
Click to enlarge |
This dive, on the Bare Island Bombora, is one that can only be undertaken in completely calm seas. In addition, you will need to be a very experienced diver, good on your air consumption, and use a large (at least 12 litre) tank. You should also try to dive at or near the high tide as currents can sometimes sweep across between the island and the bombora.
Like most of the other dives here, you start on the island itself. Walk across the bridge and climb down onto the rock platform via the stairs. Walk around the island towards the open sea until you come to the very back left corner of the island. This spot is an ideal entry point when the seas are calm. Enter on the eastern side of the rock platform, not the southern side.
 |  |
A new underwater map of Bare Island created by Marco Bordieri from www.viz.org.au.
This is not yet complete as you can see. For a much larger pdf version of this map, click here.
Used with permission of Marco Bordieri | Information about the map at left and below |
The bombora is located due south from this point. Once in the water, swim out about 20 metres and then about 20 metres to the south. Sink to the bottom and navigate by your compass towards the south-east till you hit the sand edge. Then follow this to the south. The bommie is located about 250 metres from the island (due south as mentioned above). It should take you about 10 to 15 minutes to reach the bombora. You should not linger a bit on the way as you can explore the reef on the way back. Once you reach the bombora (really two small bommies), have a look in between the two shallower sections.
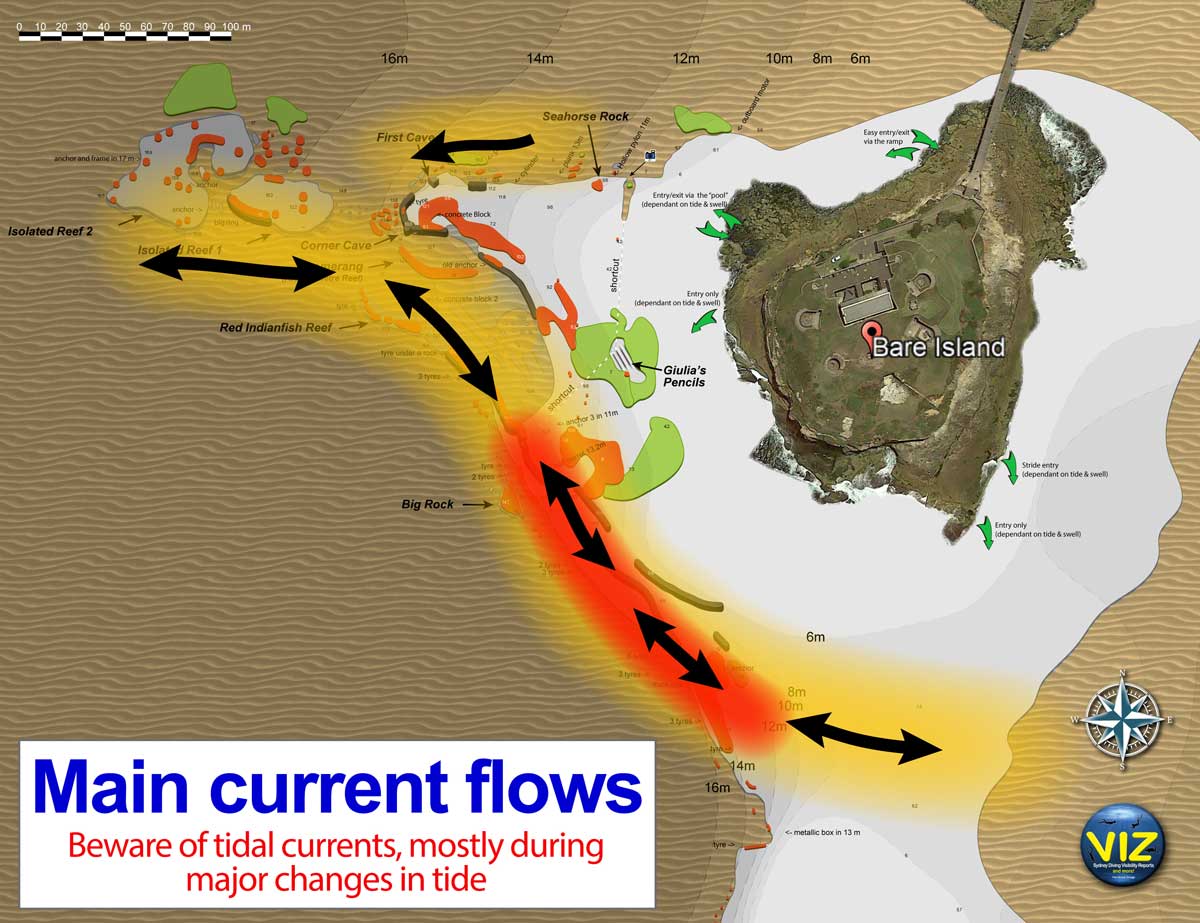 |
This shows the predominant tidal currents at Bare Island. Incoming are the currents to left, outgoing to right. Created by Marco Bordieri from www.viz.org.au using my information.
Used with permission of Marco Bordieri |
If you have a large tank, you can swim right around the bommie, looking into all the nooks and crannies. There are some large overhangs. If you only have a small tank or are heavy on your air consumption, you should only examine the front part of the bombora. Above the bombora there are normally quite a few huge old man snappers. These are giants, the size you will very rarely, if ever, see anywhere else. In fact, every time I have dived here I have seen them. Worth diving just to see the snappers. You will also see huge schools of bream, sweep, luderick and ladder-finned pomfrets. You may even see a few very large kingfish (I did in March 2001).
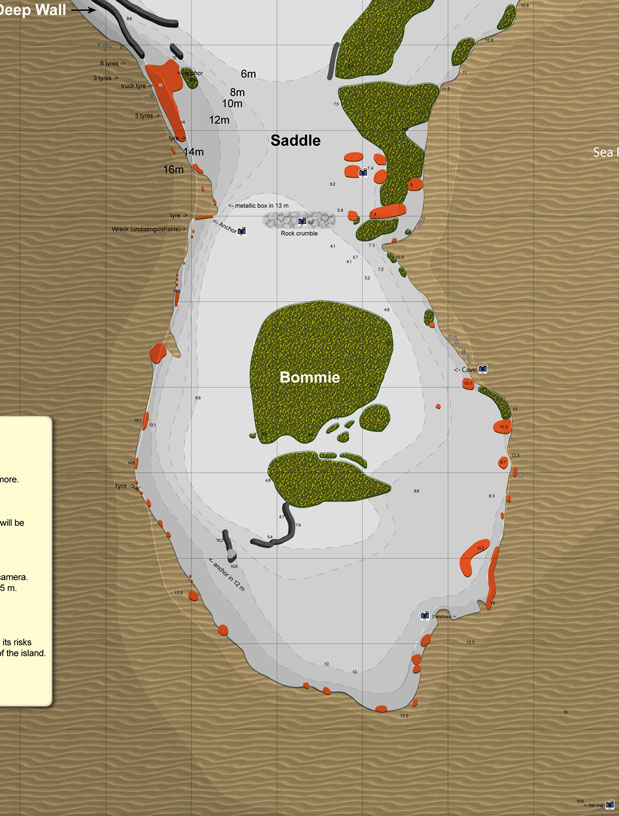 |
A larger version of the section of the new map showing the bommie area. Created by Marco Bordieri from www.viz.org.au.
Used with permission of Marco Bordieri |
After leaving the bombora, swim to the north-east. After a while (depending on where you leave the bombora) you will meet the sand edge. Follow this all the way back to the bridge. See the Bare Island Left page for more details. Along the way, look out for sea dragons. On the March 2001 dive, I counted 25 sea dragons along this edge and my buddy reckoned that there were at least 10 that I did not point out to him as were motored past (we were using scooters and as well as diving the bommie, we went right around the island).
Whatever, you do, make sure you leave adequate air for your return to the island. I prefer to return right to the bridge area and exit there, however, if you find yourself a bit short on air, return to the island and since this dive is only done when calm, you will be able to exit onto the rock platform.
Fishlife on the rest of the dive is similar to the other Bare Island dives.
WARNINGS
Things to be aware of on this dive are:
|  v6.00.307 © 2003-2005

