|
Michael McFadyen's Scuba Diving - SS Himma
The Himma was built by Cochrane and Sons in Selby, UK, as the SS Empire Pat (Lloyd's Register 168788) for the Royal Navy (British Ministry of Transport). Launched in August 1942, the Empire Pat displaced 274 tons and was 34.0 metres long overall and 8.1 wide. The ship was powered by a triple expansion steam engine.
During World War II the SS Empire Pat was based for at least part of its service in the Persian Gulf in the Middle East. In 1944 it was at Basra, now part of Iraq. She also travelled to Kuwait, then an independent principality under the protection of the British Empire. She also travelled up and down the Shatt el Arab, the river formed below where the Tigris and Euphrates Rivers meet.
 | 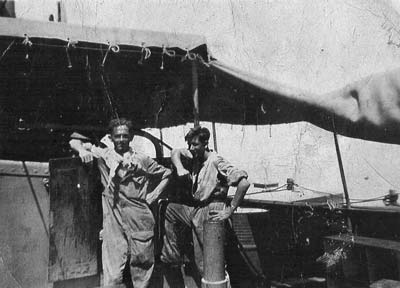 |
The Empire Pat on the Shatt el Arab - 1944
Photos courtesy Pat Browne | The Empire Pat in Kuwait - 1944
Arthur Eglinton and Bert Williams
Photos courtesy Pat Browne |
After the war it seems the tug stayed in the Persian Gulf. She was chartered in 1946 to the British Tanker Company Limited, Bandar-e Mashur, Iran. In 1949 she was sold to the Kuwait Oil Company Limited in Kuwait and renamed the Himma. In January 1951 the Himma was sold to J. Fenwick and Co in Sydney and became one of the working tugs on Sydney Harbour.
Sometime after this the Himma was involved in an incident on the Harbour when it collided, ironically as I will explain later, with the large Manly Ferry, Dee Why. Halfway between Fort Denison and Kirribilli Point (near the Sydney Harbour Bridge), the Dee Why, skippered by Captain Harold Liley, was on an early morning trip with 225 passengers and preparing to enter Circular Quay. The Himma, skippered by Captain John Boothby (Lord Boothby as he was known to his crew), came down the Harbour. The ferry passengers heard sirens blare then the two vessels collided. People were thrown from their seats and the ferry's chief engineer was thrown across the engine room floor. Seconds later the Dee Why ran aground on the rocks of Kirribilli Point.
The Himma had only suffered minor damage while the ferry had smashed one of its rudder and propellers as well as suffering damage to hull plates on the port side where the vessels collided. Soon after 8 am the Dee Why was pulled off the rocks by three tugs, including the Himma. A little known story is that a lady was stuck in the women's toilet by the force of the collision (the toilets were at each end of the old ferries) and they had to chop through the door to get her out. It was also said that she was in there drinking a flask of Remy Martin brandy! This was confirmed to me by Tom Binns (see references).
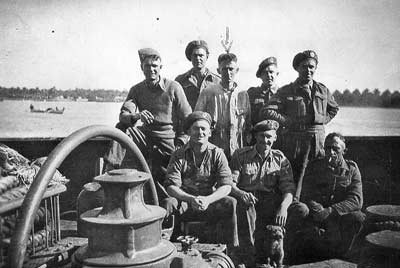 |  |
The crew of the Empire Pat in Basra
- from left Walter Cates, Bob Down, Ben Cates,
Bert Williams (arrow above), Bob Hodge, Alf Edmonds,
"Shandy" Metcalfe, Bert Tuff
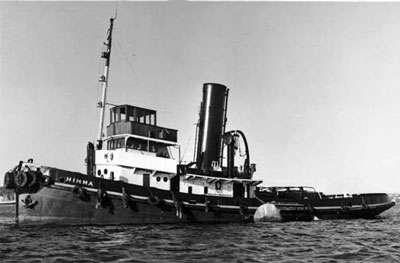
Photos courtesy Pat Browne | The Himma
Photo courtesy Tom Binns |
For some years after July 1960 the Himma was stationed at Port Kembla. This is about 80 km south of Sydney.
The Himma remained in service on Sydney Harbour until 1972. In 1972 it was sold to Pimco Shipping Pty Ltd of Port Moresby, Papua New Guinea (PNG). It may then have been onsold to another Port Moresby shipping company, W.J. Byers. One source (the Australian Government Environment Web Site) says that it was to be converted to a small cargo ship for use in New Guinea but during conversion she was damaged by a collision with a berthing containership. It is reported that the new owner died and she never left Sydney and remained derelict until scuttled 30 August 1977 at the artificial reef off Long Reef.
 |  |
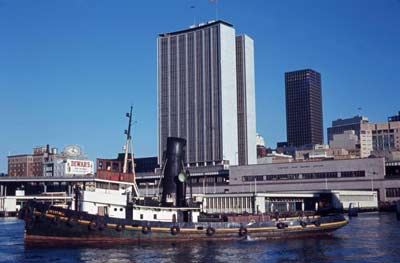
Two colour photos of the Himma
Photos courtesy Tom Binns |
Tom Binns (from Clunes, north-east of Ballarat in Victoria) phoned and emailed me in January 2007. He was a former Royal Navy Reserve officer and the relief master of the Himma in the late 1960s. He said that the Himma was damaged by a fire lit by vandals when berthed at Balmain. I assume that this was while waiting to be sent to PNG, but it may have been after it returned. I am not sure. He also told me that when Fenwicks was taken over by Brambles, he and another former staff member went to the offices and collected the only known shipbuilder plans of the vessel.
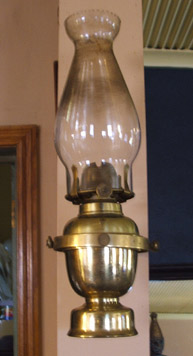
Tom advised me that he has the bridge telegraph of the vessel and the gimble oil lamp of from the Master's cabin. Apparently, the wooden bridge and wheelhouse was sold off and used as a shelter in a backyard.
 |  |
The Himma in Circular Quay - 5 May 1968
Photo by John Ward | The Himma with the P&O liner SS Orsova
at Wharf 13 Pyrmont, Sydney, 6 January 1968
Photo by John Ward |
Other sources (Ships that Serve Australia and New Zealand Vol 1 Ed 1 by R.D. Fildes published 1975) report that in 1975 the Himma was a hulk lying in Mort Bay, Sydney Harbour (owned again by J. Fenwick). The Himma was not registered after 1978.
 |
The SS Himma at Balmain just before it was scuttled
Photograph by unknown person |
Despite the above mentioned bit about the scuttling, my research has shown that the Himma was acquired by Fisheries for the fledgling artifical reef and taken out to its final resting place in 1980 and scuttled. The irony of the Himma's collision with the Dee Why is that today it is only a few hundred metres to the south east of its old Sydney Harbour workmate the Dee Why, the first ship placed on the reef.
 |  |  |
Western Mark
Run in on this
Click to enlarge | North-north-western Mark
Click to enlarge | West-north-wests Mark
Click to enlarge |
Head out from Sydney Harbour and turn left towards the north. Head to GPS reading of 33° 43.1216' S 151° 21.0853' E (using WGS84 as datum - if you use any other datum, you will need to convert the reading - see my GPS Page for more details). Use the marks at left and the GPS and Marks Page to locate the wreck.
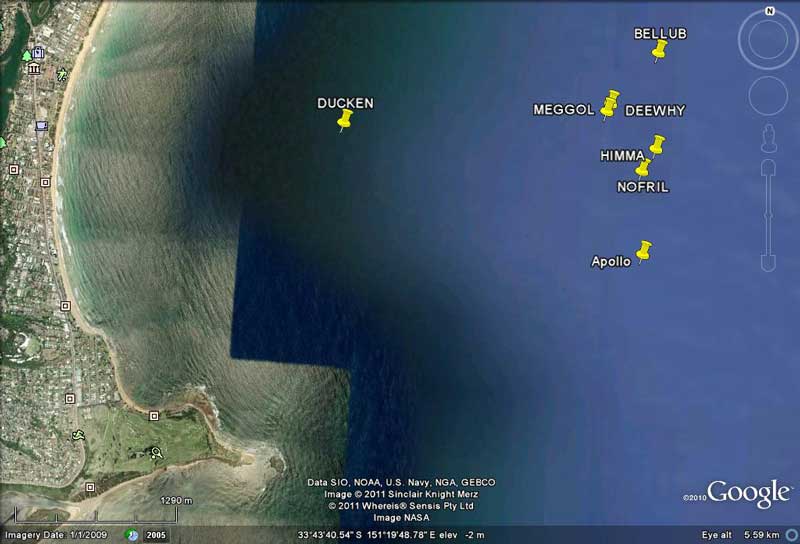 |
A satellite photograph of the coast north east of Long Reef showing the location of the scuttled wrecks
The SS Himma is clearly identified |
If judged on its originally intended purpose as an artificial reef for fishers, the reef must be viewed as a dismal failure (at least to date) as the quantity and quality of fishlife to be found on the wrecks is very poor. However, its real success lies with the excellent wreck diving the Himma and the other wrecks provide. The only real problem is that the wrecks are at a depth beyond the magical 40 metre sportdiving limit.
As outlined above, the Himma had an uneventful life after its accident with the Dee Why until 7 October 1991. On this day, two Sydney divers, Bradley Smith and Richard Yarrow, died inside the wreck when they entered the lower front compartment and could not find their way out again. In 1992 I attended the Coroner's Inquest into their deaths and since that time I had wanted to dive the Himma to see for myself what had gone wrong. (If you are interested in learning more about the accident, click here to read a copy of an article I wrote for DIVE Log about the deaths.) However, despite making plans to dive it a number of times, I had not been able to dive it before June 1996.
The Himma lies on a sandy bottom of about 50 metres, although you can reach 52 metres when swimming through a hole in the hull that enables entry into the boiler room (which has the boilers removed and looks like a hold). This is a deep dive, but with care it can be undertaken quite safely. On my first dive here the weather was perfect and the seas calm, almost millpond. When I hit the stern deck of the tug the visibility was very good (15 to 20 metres).
If you are anchored at the stern, swim along the port side and you drop a bit deeper until you will see the engine room (this looks like a hold and the engine has been removed). Quickly have a look but do not enter as if you want to explore the whole wreck you will need the time. Further along you will see a large hole in the hull. You can drop over the side and swim through the hole into the boiler room.
 |  |
The Himma's Bridge Telegraph
Photo courtesy Tom Binns | The Gimble Oil Lamp
from the Himma's Captain Cabin
Photo courtesy Tom Binns |
Exit out the top and move forward into the bridge area. Here you will see the entry hatch to the next level down. If you see this, stick your head inside. On my first dives here I had thought that the compartment where Smith and Yarrow died was below this but I now know that it was this level. This is the accommodation area. Do not drop in here as it can get very silty (read the article about what happened to Smith and Yarrow).
In February 2000 I dived the wreck once again (for the third time) and the whole bridge area had collapsed and is really impenetrable. This apparently happened about September 1999.
From here go right to the bow and look back at the wreck. Very impressive. After this go to the top of the remains of the bridge before moving back towards the stern. From the deck just behind the bridge (47m) I was able to see the sun glistening on the surface on my first dive here. On my first dive, as I neared the first hold I saw a yellowtail kingfish swimming around the hold. It had a fishing line attached to it and on the line there was something white attached. I swam into the hold with the attention of grabbing the line and cutting it off. Bad luck, the kingfish swam quicker than I did and I missed getting hold of it.
If you do go back into the hold, you can drop right to the bottom and as you do you will notice the narrow walkway leading back to the engine room. On this same dive, as I easily swam along the walkway I spied one of the biggest sergeant bakers I had ever seen. It was huge, sitting guard on the sand/silt in the middle of the engine room.
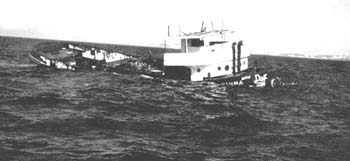 |
| The Himma about to go under |
By now time will be running out (you will probably have been down about 12 minutes so far) so quickly look at the stern winch before dropping over the stern to look at the prop. Unusually, the prop was not removed when the tug was scuttled. A maximum bottom time of about 16 minutes is probably all you need.
On the first dive here, a few metres from the bottom I looked up and to my surprise I could see the dive boat on the surface. Shocked, I looked at my computer and found I was still 37 metres down. Amazing!
On each of my dives here I have learnt a bit more about what might have occurred on that fateful day back in 1991. On these dives I found out much more about that fatal dive and that some of the things said at the Inquest were incorrect. An article on this dive is also attached to these home pages.
As I indicated above, I have now dived the wreck three times. The only thing to add to this article is that there is a large compartment between the boiler and engine rooms. This is the coal bunker. It has a hatch from the the top deck. I am not sure what is in there but there is some light from rust holes in the outer hull. In the boiler room there are even more rust holes. At the rear of the above mentioned compartment area there is a collapsed structure of some sort, I have not really had time yet to figure it out.
The collapsed bridge area is level with the main deck at its rear but at the front there is room to swim across the wreck. You can see the lower compartment through the rusted deck. At the front of the bridge there is a hatch which leads through to the lower compartment. It would be possible to enter the compartment through this if wearing a single tank, but I certainly would not recommend it if you wanted to live. See the inquest articles for more information.
References:
|  v6.00.307 © 2003-2005

