Michael McFadyen's Scuba Diving - TSS Currajong
This wreck is considered the most intact shipwreck in NSW (by John Riley) and "one of the foremost wreck dives in NSW" (by Max Gleeson). The wreck is the TSS Currajong, a collier that sank when run down by the SS Wyreema in 1910.
In 1875 the shipbuilding firm of T. Wingate and Company started construction of a vessel that was to be named TSS Marquis of Lorne. However, before she was finished she was renamed the TSS Victory but completed as TSS The Clarence (note that some entries in Lloyds Register show it as simply Clarence). This indicates that the purchaser, the Clarence and New England Steam Navigation Company (CNESNC), had acquired the unfinished hull from another shipping company. This was probably because CNESNC had lost a ship, the Helen McGregor, on the Clarence River bar in March 1875 and urgently needed another vessel.
The TSS Clarence is the middle vessel This is taken between 1879 and 1882 - Sydney Cove is in background and the domed building is the the Garden Palace
SS Wyreema
In August 1875 the new vessel was launched from the Whiteinch shipbuilding yards in Glasgow, Scotland. The 603 ton vessel, the TSS The Clarence, was a three masted steamer built to carry passengers and cargo on the North Coast of NSW run. The ship was 67.6 metres long and 9 metres wide. The ship was powered by twin two cylinder compound 250 hp steam engines (also built by Wingate) driving twin props.
The new ship left Greenock in Scotland on 12 October 1875. The skipper was Captain Wallace. It arrived in Sydney four days after Christmas 1875 and was lauded in the Sydney Morning Herald as being "judiciously fitted out for her intended trade."
The The Brisbane Courier on Saturday 12 January 1876 reported:
THE CLARENCE, S.- This steamer, built to the order of the Clarence and New England Steam Company, arrived in port on tho 29th December, and in every particular reflects great credit on the designers and builders. The Clarence has been constructed specially for the Clarence River trade, and the necessity of light draught, combined with a high rate of speed, had to be considered, and, judging from the vessel's performance, an excellent result has been arrived at.
She is 222 feet in length, 30 feet beam, and 15 feet depth of hold. She is propelled by twin screws, driven by a pair of compound engines of 250 horse-power nominal; the cylinders being 52 and 20 inches respectively, length of stroke 20 inches. Her speed when tested, was 13 knots, with a consumption of 20 tons fuel. The passenger accommodation is excellent. The saloon is placed amidships, and has accommodation for forty passengers; it is an elegantly furnished apartment, fitted with all the requirements on a most elaborate scale. The woodwork forming the divisions of the sleeping cabins and their partitions from the saloon is of polished maplewood; set off by handsom gold ornamentation.
The steerage is also of a first-class character, and is replete with all that can conduce to the comfort of passengers. On deck we find that steam winches for the ready discharge of cargo have been supplied, and in fact the, Clarence appears to have been judiciously fitted out for her intended trade. The Clarence left Greenock on the 12th October, and completed the passage to Sydney, including detention in various ports in 78 days, the consumption of fuel being about 15 tons.
In mid-January 1876, The Clarence made her first voyage to the Clarence River. Unfortunately, on her first crossing of the Clarence River bar at Yamba, she ran aground. She was still there on 22 January 1876.
It was reported on 24 June 1876 (in the paper 8 July) that The Clarence had been able to make it all the way to Grafton on her last two trips to the Clarence River.
On 8 November 1877 The Brisbane Courier reported that The Clarence was about to start run from Sydney to Brisbane for the Melbourne Steamship Company. Around this time it appears that The Clarence must have been sold to the Melbourne company. It also appears to have started work on a run from Melbourne to Sydney then to Brisbane and up the Queensland coast. It was certainly running from Brisbane to Rockhampton on Saturday 15 December 1877 as on this day she was scheduled to leave Brisbane.
On 12 February 1878 The Clarence departed Brisbane for Rockhampton and on 16 February she was due to go to Sydney and Melbourne. The skipper was J. D. Harley.
On Monday 6 May 1878 (may have been 13 May - not clear which one it was), the steam-hopper barge Schnapper was returning from Parker's Island (on the Brisbane River I assume), where she had been for the purpose of discharging her ballast. A short time after leaving Parker's Island, the Schnapper was steaming along on the Hamilton side of the river, when it was noticed that The Clarence, which was coming down the river suddenly left the opposite shore> It came down towards the smaller vessel in a way that threatened a speedy collision. The engines of the Schnapper were reversed but The Clarence struck her ahead, doubling up the strong iron stern-post as if it were "little more than tinder". A boat also which was being towed astern of the Schnapper was smashed as it ran into the propeller.
The owners of the Schnapper (Messrs. Walker) were said to be going to make a claim for damages against the owners of The Clarence. This was because they believed their own vessel was on her right side of the river, and that the accident was solely due to the course steered by The Clarence, which went aground on a sandbank immediately after the collision, but was quickly got free.
After this trip she arrived in Sydney on 15 May 1878 from Rockhampton and perhaps Brisbane.
On 8 October 1878 she left Brisbane for Rockhampton.
In late November 1878 The Clarence was slipped at the Morts Dock in Sydney Harbour. On Monday 2 December 1878 while being relaunched, the cradle on which she rested slipped off the slipway and dropped her on her port side. The ship suffered no damage and the worked quickly raised the vessel using temporary works. It was expected that it would be refloated that afternoon.
On 20 February 1879 she left Brisbane under the command of H. B. Bristowe, for Sydney and Melbourne. She was expected in Sydney the next day. On 7 May 1879 the ship left Brisbane under the command of Captain E. Boult for Sydney.
Western Mark
South-eastern Mark
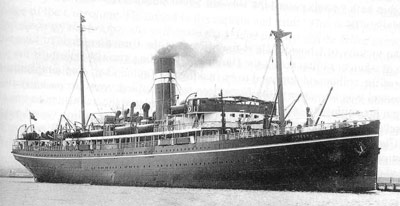
TSS Currajong
In 1883 CNESNC went broke and in March of the same year The Clarence was sold to the Australasian Steamship Navigation Company (ASNC) and in June was renamed TSS Currajong. The ship started on the Sydney to Rockhampton (Queensland) run, with calls at Gladstone, Bundaberg and Maryborough in Queensland and continued to mostly serve this route till 1886.
On Tuesday 18 September 1883 the Currajong left Brisbane for Sydney.
Around this time ASNC also started to have problems. Most of the ASNC fleet was sold to the Australasian Union Steamship Navigation Company in April 1887. After this, the Currajong was laid up in Lavender Bay in Sydney Harbour until she was sold to Mitchell and Woolcott-Waley in 1888. This company was owned by Joseph Mitchell and Fred Woolcott-Waley. They were in partnership for 5 years as fuel merchants and shipping agents.
After Mitchell and Woolcott-Waley purchased the ship, she was overhauled, presumably this included conversion to a collier to serve the South Bulli mine which was owned by Thomas Saywell. Mitchell and Woolcott-Waley had a contract to purchase all the mine's output. Fifteen months after the overhaul she was in dock again and had a lot of work done. When the work was finished, she was taken for a test run and an afternoon's fishing at Long Reef.
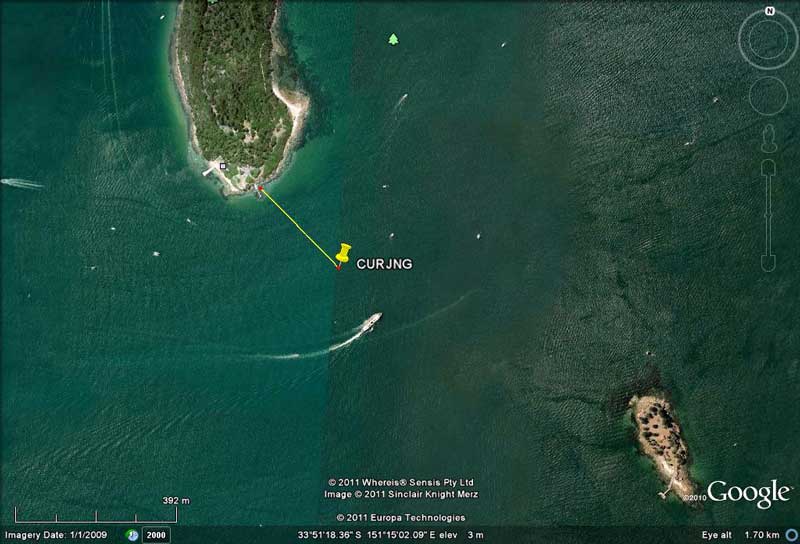
A satellite photograph of Sydney Harbour showing the location of the TSS Currajong Shark Island bottom right and Bradleys Head middle
They also established Bellambi Coal Company. At the very end of 1892 Bellambi Coal Co acquired Mitchell and Woolcott-Waley business (of buying the coal and selling it on), with Mitchell leaving the company and Woolcott-Waley taking on Mitchell's previous role as Managing Director of Bellambi Colliery. Bellambi Coal Company directors included some significant shippers, such as James Burns of Burns Philp, and MacEacharn and McIlwraith.
In 1892 or 1893 the Currajong was officially transferred to the Bellambi Coal Company. They used her to carry coal from the Illawarra area to Sydney. For 11 years the Currajong was incident free until 27 September 1899 when she ran down and sank the Lansdowne, a ketch carrying timber from the North Coast. This happened in the western channel of Sydney Harbour. The Lansdowne was later raised and repaired. The skipper of the Currajong was found by the Marine Board of NSW as being at fault. However, his master's certificate was not cancelled.
At 1 am on 4 April 1904 the Currajong collided with the paddle ferry Victoria opposite Circular Quay, causing damage to the ferry.
A diagram of the wreck of the TSS Currajong Courtesy of Scott Leimroth
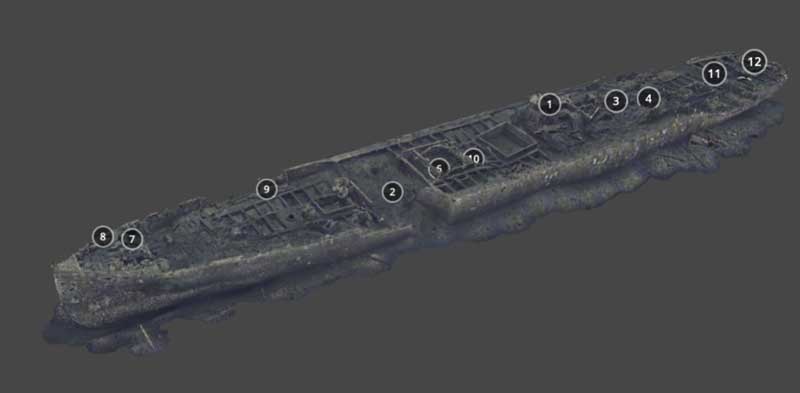
A diagram of the wreck of the TSS Currajong by John Riley John Riley Memorial Collection, Heritage Branch, OEH
At 2 pm on Tuesday 8 March 1910, TSS Currajong left the Bellambi Wharf with a load of coal from the Illawarra. Just before 9 pm the same night, the Currajong entered Port Jackson (Sydney Harbour) and headed up the Harbour towards the SS Riverina which was awaiting her load of coal. As the Currajong neared Bradleys Head, the huge (and brand new) 6,000 plus tons passenger liner, SS Wyreema, bound for Cairns approached from the west. As was later to be shown at the Marine Inquiry, the Wyreema was travelling on the wrong side of the channel and hit the Currajong amidships on the port side. The Currajong started sinking immediately and the helmsman, Hans Neilson, was killed.
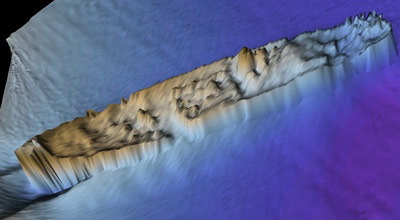
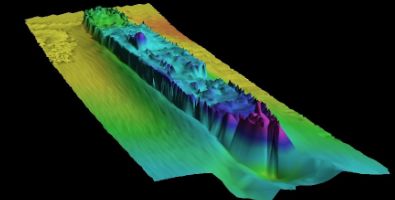
Sonic Scans of the TSS Currajong wreck shows how accurate Scott's diagram Data collected by RESON SeaBat 8125 multibeam echosounder Provided by Charles Brennan
Soon after the sinking, divers visited the wreck but she was not salvaged. However, the masts and funnel were removed as they were considered a shipping hazard. According to Max Gleeson, the wreck was blown up in the early 1980s, presumably to deepen the Harbour's depth in this area.
The Currajong now lies 230 metres off Bradleys Head in 26 metres of water. Unfortunately, it also happens to lie in the main incoming shipping channel for Sydney Harbour. Every incoming ship and each Sydney bound Manly Ferry and Jet Cat passes right over the wreck (or over the area next to it).
As well, dozens of tourist ferries, private boats and yachts pass by Bradleys Head each hour. Many pass straight over the wreck or the area between the wreck and land. As can be imagined, this makes for a very difficult and potentially dangerous dive. I am not sure of the legalities of diving the Currajong (it is certainly illegal to do it from a boat).
A view from the starboard side of the Currajong
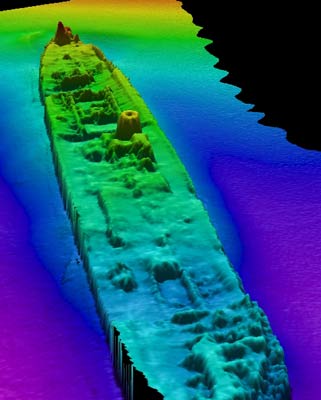
This is how the wreck looks from above, north to the top
New 2009 Sonic Scans of the TSS Currajong provided by Charles Brennan using Sonic 2024 made by R2Sonic in Santa Barbara, California (www.r2sonic.com).
I first did this wreck in December 1995 when Max Gleeson took me to the wreck. For doing this dive as a shore dive, start about 35 metres to the east of the bottom of the stairs and head out at 120° for about 220 to 230 metres. This will take about 10 minutes. Once you get deeper than 8 metres, go left and right for a bit and you should find some stakes in the sand. Once you do, head in the same direction and you should see one every five metres. Follow them. They were installed in the 2000s by a member of my dive club.
If you do not strike the wreck (it faces almost straight on to Bradleys Head), once you hit 22 or 23 metres deep, you have gone too far so turn to your left and within 20 or 30 metres you should see the wreck. The depth actually comes up a bit as the sand has built up around the wreck for most of the length. I have more recently done this wreck using scooters, very easy to find then.
See the marks at left for more details about boat diving but remember the dangers and possible illegalities. GPS Reading is 33° 51.3050' S 151° 14.9354' E (using WGS84 as datum - if you use any other datum, you will need to convert the reading - see my GPS Page for more details)
This shows clearly where the Wyreema hit the Currajong
This is looking from the stern towards the bow
New 2009 Sonic Scans of the TSS Currajong provided by Charles Brennan using Sonic 2024 made by R2Sonic in Santa Barbara, California (www.r2sonic.com).
As I indicated above, the hull of the Currajong is almost completely intact and sits upright with the bow pointing straight towards Bradleys. The deck here is in 18 metres while under the bow the sand has been removed by the tidal currents and you can reach 23 metres or so. The Currajong is a fairly large wreck, almost 70 metres long and it takes a good seven minutes to swim slowly along its length, examining it briefly as you go.
At the stern, the depth of the deck is 22 metres and the sand under is 27 metres or so. The rudder is hard a'starboard but you cannot see the two props which are buried in the sand. Under here there are huge schools of jewfish, bream and luderick. Above the rudder, the poop deck sits up from the main deck level and is also full of huge bream and luderick. Returning along the wreck you pass the rear hold before encountering the bridge/engine area.
The bow of the TSS Currajong with Max Gleeson top right
The bollards at the bow of the TSS Currajong
The higher structures are now gone but a fair bit of the lower cabin areas still remains fairly intact. You can swim partially into them but a huge volume of dead oysters has almost filled the rooms. In fact, the whole ship is covered in oyster shells, filling every hold and hole. As you swim aloing the deck, schools of yellowtail, bream and one-spot pullers swarm off the wreck onto the sand.
The donkey boiler is exposed in this area and in front of this there is another hold. Further up the wreck on the port side you can see the spot where the Wyreema rammed the Currajong. This is right on the forward hold. You will have seen it if you swum down the port side from the bow. The hull is pushed right in and wraps wound from the stern area. A couple of large winches can be seen just in front of this hold and on top of the forecastle. You can look under the deck here but the clearance is only a foot or so.
The indentation caused by the SS Wyreema is clearly visible - the hull is bottom left and continues top right
The bent back section of the hull is the bit to left of the middle - the hull continues to the right
This is an amazing wreck, but one that will only ever be experienced by a few divers due to its hazardous location (well, that is how it was till recent years when a dive operator started doing this as a dive after midnight). The visibility varies from a few centimetres to 10 metres or more. It is best done on an incoming tide, towards high tide.
The hold in front of the indentation
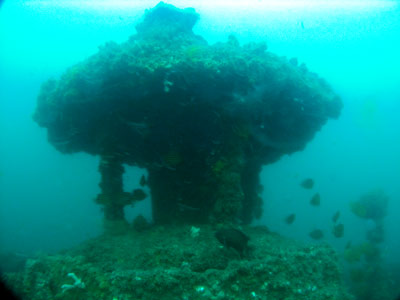
The donkey boiler
In summary, one of NSW's best wreck dives but only for the experienced and brave (and perhaps stupid).
VIDEO
A video I shot on 28 October 2012 when I dived the wreck from the shore with Mark Simpson and Gary Perkins using scooters.
3D MODEL
A 3D diagram of the wreck. See below for how to access it and review in detail Courtesy of Submerg3D.
 v6.00.307 © 2003-2005