"Bare Island Deep Wall has pygmy pipehorses if you look closely"
HMNZS Moa
Michael McFadyen's Scuba Diving - HMNZS Moa
HMNZS Moa was one of three Bird (or Kiwi) class corvettes constructed for the Royal New Zealand Navy. The other ships were HMNZS Kiwi and HMNZS Tui. The Moa was ordered 2 May 1939 and the hull was laid down on 19 March 1940. It was launched on 15 April 1941 as hull 314 from the Henry Robb shipyard at Leith, Scotland. The new ships were based on the experimental minesweeping trawler HMS Basset built in 1935 and the second HMS Mastiff. However, they were larger.
HMNZS Moa
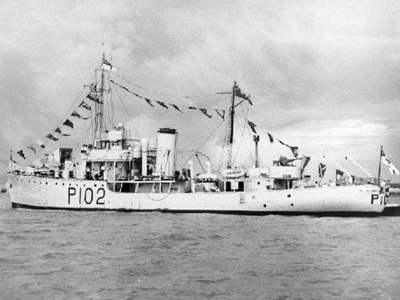
HMNZS Kiwi
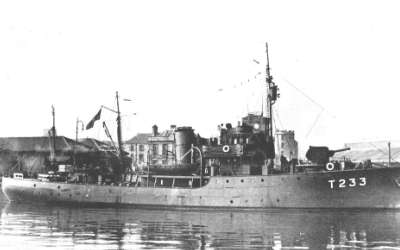
HMNZS Moa was commissioned on 12 August 1941 with the number T233. The Moa was 51.2 metres long overall and 9.1 metres wide, 600 tons standard and 923 tons deep load. Powered by a triple expansion steam engine of 1,100 ihp (steam from one oil fired one cylinder boiler) built by Plenty and Sons Ltd of Newbury, the ship had a maximum speed of 13 or 14 knots and a cruising speed of 10 knots.
The ship was crewed by 35 men (one report says 54 men) and had one 4" BL Mk IX gun, two .303 machine guns, a twin Lewis gun and 40 depth charges. In 1942 the Lewis gun was replaced by one Oerlikon 20 mm gun when she was being repaired in Boston. In 1943 another 20 mm was installed without official approval. This was said to come from USS Majaba, a freighter that had been torpedoed off Guadalcanal on 7 November 1942. These additions increased the displacement to 1,025 tons.
After leaving Greenock, Scotland, on 1 November 1941, the Moa sailed as part of a convoy to St Johns, Newfoundland, Canada. She then went on to Bermuda, Jamaica, Panama and San Diego. She was to then go to Honolulu but after Pearl Harbor was attacked, the Moa left 8 January 1942 for Papeete, Tahiti and Suva in Fiji, arriving 4 February 1942. Some repairs were required at St Johns and Panama. The Moa stayed in Suva until HMNZS Viti returned from a refit at Lyttelton, Christchurch, New Zealand. While in Fiji, the Moa hit a coral reef and damaged the asdic (sonar) dome. She finally arrived in Auckland on 11 April 1942 after a trip of over five months.
The ship was immediately placed under the command of Lieutenant Commander Peter Phipps and became part of the 25th Minesweeping Flotilla, together with the Kiwi and Tui which had arrived in New Zealand in May and August 1942 respectively.
On 30 July 1942, the Moa left Auckland and during August and September 1942 was based in Noumea, New Caledonia. In October 1942 she went to Norfolk Island to protect freighters unloading there before continuing on to Auckland for fuel and stores. On 27 November 1942 she left Auckland and returned to Noumea. In mid-November 1942 the Kiwi and HMNZS Matai had travelled from Noumea to Port Vila in the New Hebrides (now Vanuatu) and then to Espiritu Santo, also in the New Hebrides. They returned to Noumea and as of 8 December 1942, they were back in Noumea as was the Moa and the Tui. On 9 December 1942 they all left Noumea and escorted a convoy via Espiritu Santo to Tulagi in the Solomon Islands, arriving 15 December 1942. Four days later the four ships started work, patrolling the Guadalcanal area, especially off Tulagi and Lunga.
On the night of 2-3 January 1943 the Japanese made a large push down The Slot towards Guadalcanal. There were eight ships and HMNZS Moa was on guard off Kukum Beach when the Japanese arrived and off-loaded their supplies. The Moa stayed silent right through this episode and was not discovered, even though they were only a mile away and the voices of the Japanese could be clearly heard.
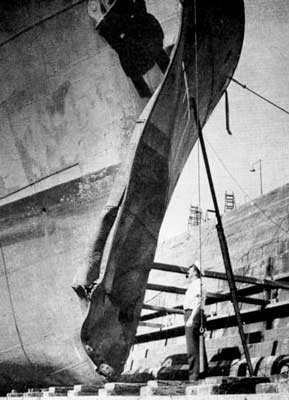
Another shot of the bow of HMNZS Kiwi in drydock
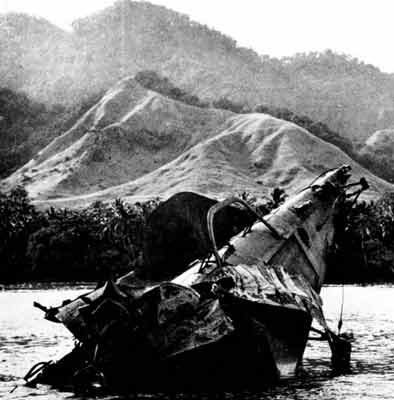
The bow of the I-1
On the night of 29 January 1943 the Japanese submarine I-1 was under the command of Lieutenant Commander Eiichi Sakamoto off the Kamimbo Bay area (near Tambea or Cape Esperance), west of Honiara, when it was detected by the New Zealand corvettes HMNZS Kiwi and HMNZS Moa. The I-1 was a Junsen (cruiser submarine) Type 1 submarine launched on 15 October 1924 as No. 74 but completed 10 March 1926 as I-1. One of four constructed by Kawasaki at Kobe (all were lost in the war), the I-1 was a very large submarine displacing a maximum 2135 tons at the surface. She was 319 feet long and powered by twin shaft M.A.N. 10 cylinder 4 stroke diesels giving 6000 bhp and two electric motors of 2600 ehp. The I-1 had six torpedo tubes and carried 20 "Type 95" oxygen-driven torpedos.
As the New Zealanders approached, the phosphorescent outline of the submarine could be clearly seen so the Kiwi dropped six depth-charges. Shortly after, it dropped another six and the submarine was forced to the surface with its electric motors apparently disabled. Switching on its diesels, the I-1 made a run for it and a surface battle ensured, with all three vessels exchanging gunfire. During the short battle, the submarine altered course to starboard just before the Kiwi rammed it on the port side abaft of the conning tower. Numerous hits were landed at this time. The Kiwi again rammed the submarine and an officer, probably the Japanese Captain, was seen to be hit by machine-gun fire. A third ramming damaged both vessels and the Moa took up the chase, following the submarine while continually firing its gun. More than two hours after the first attack, the I-1 hit a reef that was to become its final resting place. The next morning revealed the I-1 projecting about 40 to 50 feet out of the water at an angle of 45 degrees.
The next night, the Moa was still on patrol in the Cape Esperance area. At 0300 on 31 January 1943, the ship's crew spotted four Japanese landing craft. They went after them, sinking two but the other two escaped into the shallow water and could not be sighted. The Moa was hit by one 4" shell from one of the landing craft. Quite a few New Zealanders were injured from burns and splinters, but none too seriously.
On night of 12 February 1943 the Moa towed a former Japanese landing barge to the Russell Islands. The barge was to be used to investigate the Russells. On the way the ship was attacked by a US Catalina PBY flying boat but was not damaged.
On 17 February 1943 the Moa left Guadalcanal with officers of the American 43rd Division as well as from the Navy and Marines. She sailed over to the Russell Islands and just after dark, the men were landed on Banika Island. They transferred to a landing boat and went ashore at Renard Sound. For the next day, these men reconnoitred the island to determine whether there were Japanese on the islands and to find landing beaches and sites for airfields. They returned to Guadalcanal on the night of 18-19 February 1943, possibly also on the Moa.
A few days before (or even on) 7 April 1943, the Moa hit a coral reef and totally lost the asdic (sonar) dome.
On 7 April 1943 the HMNZS Moa was refuelling from the oil storage barge (described as a tanker in some reports) USS Erskine M. Phelps at the end of Tulagi Harbour in the British Solomon Islands. As well as the oiler USS Kanawha, there were 15 torpedo boats and their tender Niagara, three tugs, the Navy transport Stratford, six transport ships, eight landing craft, the minesweeper Conflict, the net tenders Buttercup and Aloe, the US coaster Awahou and some auxiliary ships.
At about 1230 news came through that planes had been sighted leaving Bougainville heading for the Guadalcanal area. At about 1502 hours 67 Val dive bombers and 110 Zeke (Zero) fighter planes were sighted over Savo Island to the west. Of these, 18 went in the direction of Tulagi and while 15 of these went for the biggest target in the harbour, the oil tanker USS Kanawha, at least some attacked the HMNZS Moa.
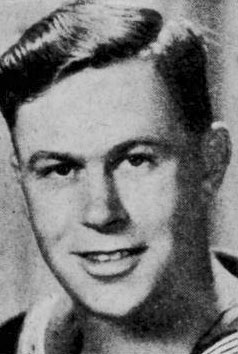
Able Seaman Kenneth Bailey
Leading Seaman J. C. O. Moffat
The Moa was hit at least one bomb (other reports say two bombs) in the commanding officer's cabin (the other is reported as hitting the boiler room). It is also reported that there were two near misses. The Moa sank in 3.5 to 4 minutes. Five crewmen were killed, Leading Seaman J. C. O. Moffat, Able Seaman K. Bailey, Leading Stoker H. D. Crawford, Stoker E. J. Buckeridge and Telegraphist C. Duncan. Lt Com Phipps and seven others were severely injured and another seven injured to a lesser degree. During the action, Lieutenant C. Belgrave dived under the water and rescued Assistant Steward W. J. Malloy who was unconscious. Leading Signaller J. L. W. Salter and Ordinary Telegraphist Bright saved Signaller F. Thomas who was also severely wounded and on the bridge. Salter and Bright were awarded the British Empire Medal.
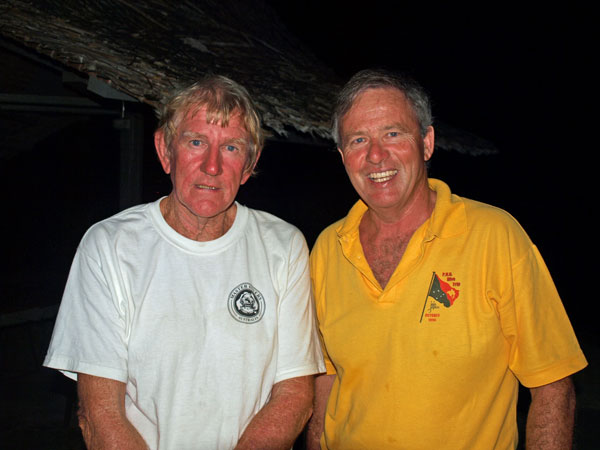
Brian Bailey and me in 2009
An interesting thing about the Moa was that the whole bridge was built from 5 mm brass plate. As can be imagined, this was very valuable. In 1973-4, Reg Thomas pulled the condensers out of the engine room. In December 1974 a Japanese fishing fleet mothership dragged anchor during a cyclone and hooked its anchor into the wreck. The owners or Captain of the ship asked Brian Bailey and Reg to recover the anchor. When they dropped to the wreck, they noticed that the now totally destroyed bridge was a shiny yellow! They freed the anchor (it may now not have been on the wreck) and then went about salvaging the bridge.
They used explosives to blast the bridge away and then took it to shore where they cut it up into small pieces. These needed to be able to fit into 44 gallon drums as this was the usual way of transporting valuable metals back to the recyclers in Australia. They also found and took silverware from the officer's wardroom.
Today the ship is located about 1.1 kilometres from the wharf at the Tulagi Dive shop. Its location is GPS S9° 5' 42.1" E160° 8' 57.2" using WGS84 as a datum. There is a mooring at this location which is a few metres under the water. The wreck lies on a silty bottom of about 40 metres. With a slight list to port, she lies facing south-east. The mooring is on the starboard side just forward of amidships.
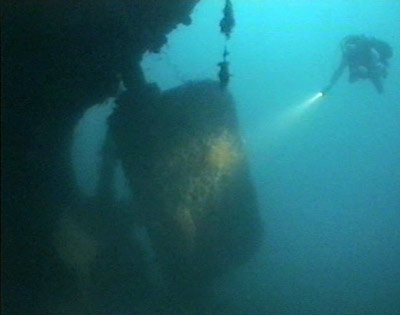
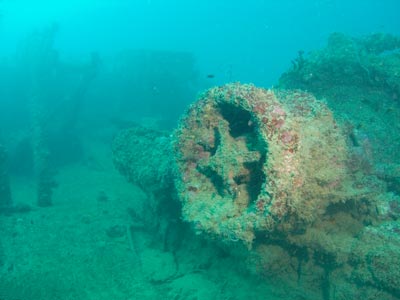
Once you hit the bottom head north along the starboard hull. A short distance along you will see the large hole in the hull where the ship was hit. Further along if you are near the bottom (40 metres) you will see the prop and rudder. The rudder is hard a'starboard. The propeller is huge, and you can get a great photograph of the prop and a diver from the port (deeper) side.
Andreas Thimm and the prop and rudder of HMNZS Moa Photo from Hi-8 video
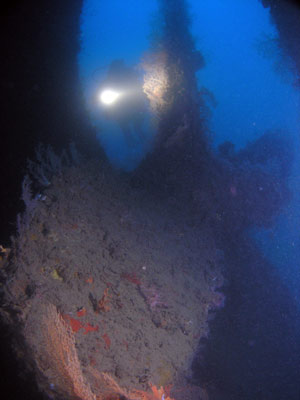
Kelly and the prop of the Moa
Ascending from the prop you will see the twin depth charge racks. The deck here is about 36 metres. The depth charge racks were used to drop depth charges over the stern of the ship as she moved forward. There are the remains of four depth charges still in the port rack, the rear two are almost totally corroded away, the next is almost intact and the other quite corroded. There is an intact one below this rack.
The superstructure of the ship has collapsed. As you swim along the port side you get closer to the bottom as the hull at the bow seems to have collapsed. There is a large gun here (the 4 incher) which is pointed slightly up and to the starboard. The depth here is about 38 metres. The bow itself is buried in the sand and about 39 metres. There is an AA gun here, as well as some winches and bollards. There are more bollards along the sides.
The rear winch of of HMNZS Moa
Kelly highlights one of the depth charges in the port depth charge rack
Back along the starboard side the hull is higher up (36 metres) and behind the gun and in front of the engine room, the starboard hull was rippled from bottom to top in 2001 but in 2009 it is cracked right open. I have been told that a large ship's anchor caused this, but I am not sure of this. The ship is cracked right across the deck here.
Behind this there is a compartment which has two doors visible on the starboard side. The front one just goes across to the other side, while the rear one has a hatch that goes down to a lower deck.
Two unnamed females trying to impersonate Cher!
A close up of one of the depth charges
The engine room is open but as this is a small ship, it is very difficult to do any real penetration as the hatches and doorways are quite small. In front of this hole you can see the large boiler. You can actually swim over the boiler and out a hatch if you are not wearing twins. The engine room is home to some firefish. In fact, there are lots of firefish on this wreck. The deck of the ship in some parts seems to (at least in 2001 and 2009 when I dived it) have some timber decking still in place.
You quickly return to the mooring area. As mentioned, this is a very small ship and you can easily cover it all quickly in 10 minutes at a push. Only one dive is needed. I did this as a second dive after the USS Kanawha (with a long surface interval) and 21 minutes gave us decompression of 1 minute at 6 metres and 11 minutes at 3 metres. In 2009 we did 23 minutes with about 3 minutes at 6 metres and 13 minutes at 3 metres on a first dive and a little less on a repetitive dive.
Video of dive on HMNZS Moa on YouTube - 22 mb
You can dive the wreck Tulagi Dive, the only dive operator who dives this as far as I know. See my Tulagi page for more information. Note that as this wreck is well up Tulagi Harbour, it can suffer at times from poorer visibility than other locations around. However, it can be up to almost 20 metres and is still not too bad even when it is at its worse. Water temperature of course is always in the high 20°Cs.
 v6.00.307 © 2003-2005