|
Michael McFadyen's Scuba Diving - Container Wall
This dive location was not one that I discovered, but it was shown to me by Les Caterson, former skipper of the well known Sydney dive boat, Cat Dive and who I now dive with most often. Not only do you dive "underground" but you will encounter some of the biggest fish that you will ever see.
In the late 1960s it was obvious that Sydney needed a new port to replace and augment the old fashioned wharves of Port Jackson (Sydney Harbour). The then Maritime Services Board decided to develop Botany Bay into a major port so that it could take over a great deal of the maritime traffic that was at that time using Port Jackson. Unlike Sydney Harbour, Botany Bay is not naturally a very protected anchorage and there were no suitable available areas in which to locate a port. Therefore, a protected port had to be constructed and in the early 1970s a huge retaining wall had to be built out into the middle of the bay to provide the necessary protection for the new wharves.
The wall was built out from Bumborah Point near the old Bunnerong Power Station. The wall consists of a granite base with concrete blocks and tors piled on top. This provides the actual retaining wall and the filling behind this consists of sand which was dredged from the bottom of Botany Bay. The wall, constructed primarily as it is of concrete tors, is full of holes and tunnels created by the overlapping of the pieces. In the truest sense they are not really tunnels, but this is the closest description I can come up with that really lets a person know what I mean. Perhaps grotto may be a better description.
 |
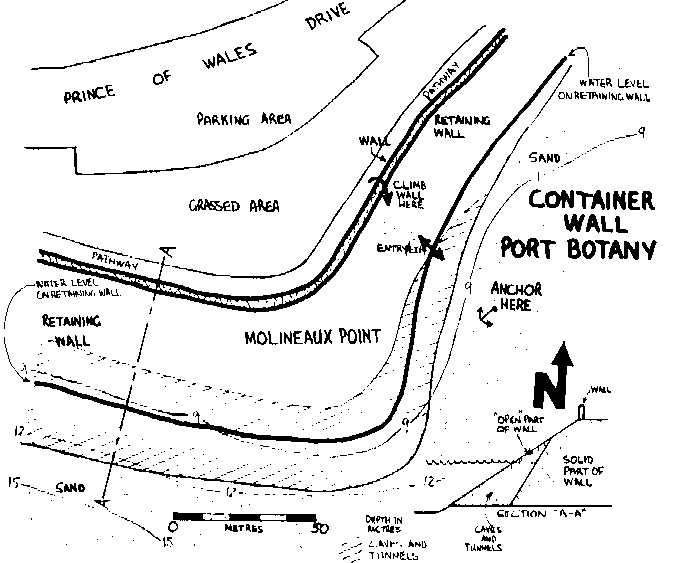
A map of the Container Wall
Click to enlarge |
Access to this dive site is either by boat or from the car-park at Molineaux Point, which is located at the end of Prince of Wales Drive, Port Botany. If diving from a boat, anchor to the east of the end of the main wall. Go to GPS Reading latitude of 33° 59.1218' S 151° 12.7522' E. (using WGS84 as the map datum) and then move towards the wall and anchor. In normal seas you will only need to move about 5 to 10 metres off the wall to drop anchor. By vehicle, park in the car-park and before putting on your equipment, take a short walk to the small wall to the east.
Pick the easiest spot to climb over the wall and try to locate a suitable route over the top of the concrete tors to the water's edge. Now, don your equipment and walk to the preselected spot. One person should, after taking off their tank and BCD, climb over the wall. Pass all divers' tanks, BCDs and other gear over to the first diver. Put it all back on and follow your predetermined route down to the water. Be extremely careful while climbing down as it is fairly steep and one mistake could see you fall two or three metres. You may also run into a dead end as you go down to the water, so you may have to backtrack to get to the edge. Because of the difficult route, it is definitely recommended that you only take a small tank on this dive. You will also need a torch as it is very dark under the wall.
From a boat snorkel over to the wall. Drop to the bottom and head south. The tors are neatly stacked on top of each other above the water-line, but below they are haphazardly placed. This has created a myriad of caves and tunnels that extend for a long section of the wall, but they are biggest on the open bay end of the wall (ie, the southern side). At this spot the tunnels are not real big, but soon you will see the tors open up and you can begin exploring inside some of the smaller caves. Further along after you round the corner and head west, the caves and tunnels become larger and more extensive. In some of these caves you can travel up to 20 or 30 metres without returning to the open sea. Care should be taken to ensure that you take note of your route into a tunnel as in some places it may be necessary to back out the way you came in. However, most tunnels can be entered in one spot and exited in a number of different spots. Sometimes you may need to ascend to the surface and swim back to the outside of the wall and descend again.
Inside the tunnels you will see huge mullaway (jewfish) up to 1.5 metres in length, bream and luderick of 75 cm and numerous other species of fish. Crayfish can also normally be found here.
After you have completed your exploration, you can either return back through the tunnels or swim back along the edge of the container wall. If you swim back along the wall, beware of the large number of fishing lines that you may encounter and get tangled up in.
Unfortunately, if you travel to this site by road there is a need to leave a person with the vehicle as there are numerous cases of damage and theft being caused to cars left here. I personally had four brand new tyres slashed while on a dive at this location. It is possible that this damage may be caused by irate fishers who think that divers disturb the fish. In this area certainly, the opposite is true, as divers normally drive the fish out of their dark holes into the open where they might be attracted by the bait on offer.
| 
 v6.00.307 © 2003-2005