|
As I get older, I realise that things I used to be able to do easily are a little bit harder. This will only get more pronounced the older I am. Since the early 2000s I have used a Shippshape rooftop tent when camping. While this is great, it is not so good when I want to go to one place and not move campsite but drive around the area. You have to pack up every time you want to go for a drive. Of course there are advantages, it is extremely quick to set up, but there are other downsides that I will detail later. The main problem is climbing up and down the ladder, much harder as you get older.
My original plan had been to purchase a caravan when I was in my late 60s (about 2024/5 or so) but I decided in early 2021 to get a camper trailer within a year or so and when I was in my early 70s, upgrade to a caravan. From late 2021 when I returned from my 13.5 week trip to Queensland and South Australia, I started to look on the market. When I was away I had looked at various models and when I started again, I decided that I wanted a Black Series Dominator (the brand was formerly called CIG Black Series and perhaps now might be changing again to Kings Black Series).
Anyway, I started looking and found that most were advertised either on Facebook Marketplace (probably two out of every three) and the rest on Gumtree. Very few were advertised on other places, although I did see some.
WHAT I WANTED
I wanted a hard floor camper which was built for off-road. I only wanted sleeping for two, so I went for the four bed ones as the larger six bed ones were bigger and more expensive. I also wanted it to be relatively cheap, say from $13,000 to under $20,000. The Black Series Dominator met these criteria.
BLACK SERIES DOMINATOR
I suppose I should start with the fact that a lot of the hard floor camper trailers available are not only made in China, they appear to be basically identical, despite the brand being different. It seems that there is a company in China that makes a base camper and then they are imported into Australia and perhaps modified and finished off here with different equipment and slight layout changes.
For example, Black Series Dominator, MDC Jackson, EzyTrail Stirling, Goldfields Grand Duke and Mars Spirit all appear to share the same body. The price difference between them new was huge, although as I write this in April 2022, the Black Series Dominator was increased in price by about $6,000 when they were taken over by Kings/4WD Supa Centre.
I looked at purchasing new but a number of factors made me decide to go second hand. The main one was that due to the Covid-19 pandemic, supply of all new cars, camper trailers, caravans and boats were in very short supply with very long delivery times, over a year in some cases. The second reason was I could not see the sense in spending top dollar for a new one when there were many second hand ones available.
LOOKING, LOOOKING
I started looking for a Black Series Dominator in November 2021 and the next month I started recording them, then putting them in a spreadsheet to compare the prices as well as the features (lots of them have extra after market additions). For January through to the end of March, I recorded the details of 43 Dominators, all but a couple of which were located in Sydney or within five or so hours drive. There were also some others that I did not record as the prices were either way too high (over or near new price) or looked awful.
The prices of the ones I recorded ranged from $10,000 to $19,250 and the years from 2015 to 2020. There were 12 2017 models, 9 2019 models and 7 2018 models. Prices for the 2017 models ranged from $12,500 to $19,250 without any obvious difference to justify this difference. The $12,500 one dropped to $10,000 but a day later disappeared, perhaps sold. The $19,250 one appeared to be stock with no added extras and was on a farming auction site at a fixed price. I offered $10,000 which with GST (which had to be paid via this site), made it $11,000. I offered to negotiate but over 13 weeks later it was still there, unsold, albeit the price had dropped to $17,050.
Anyway, I started looking at ones in and around Sydney. I looked at two in my council area, travelled to Picton south-west of Sydney and Tuggerah Lakes north of Sydney as well as out past Liverpool and some others. Of these, a couple had strange changes made which I did not like and others were more worn than they appeared in the photos. My favourite became one down near Wollongong but the day it was posted on Facebook the owners went interstate on holidays and then when they came back, it was raining so much they were not prepared to show it to me. They then went on another holiday, so plans were made to look at it when they came back.
Then I saw one for sale in Wagga Wagga (well two really, but one was way over priced). I was going on holidays in a few days time to South Australia and would be passing through Wagga Wagga on the Friday, so I arranged to look at it in the morning. It was raining when I arrived but the owner had set it up. I checked it out. It did not appear to be in as good condition as the one near Wollongong but was a lot cheaper and also had a few more extras.
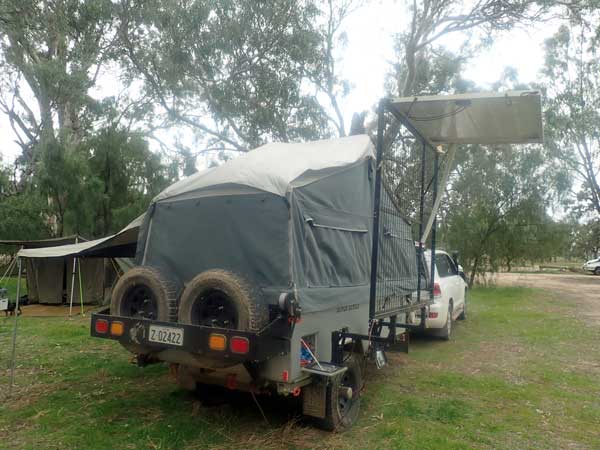 | 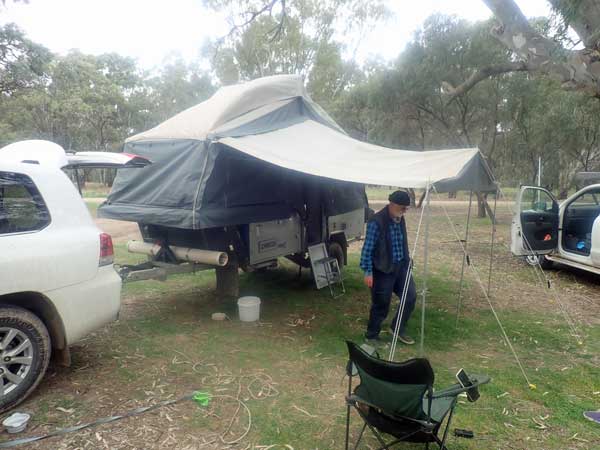 |
| Set up at Sandy Point | Another shot of the Dominator |
One of the things I noticed when I started looking for a Dominator was that a good guide to the condition and use of it was what the safety chains looked like. If they were very rusty, they had spent a lot of time off tarred roads, if they were shiny, they had spent very little time off tarred roads. This one had shiny chains. It also had 220 watts of solar, two new 120 ah batteries, a hot water shower as well as a Redarc DCDC/solar charger.
I asked if he would accept an offer and he said yes, I made one and he accepted $10,000. I paid a deposit in cash and made arrangements to pick it up in 13 days on my way home. On the way back two weeks later I picked it up. A problem I found straight away that I did not even think of looking at was the trailer plug. I have a standard 7 pin plug but this had a plug that had the 7 pins and then another 5 pins. I had never seen one of these before.
I headed down to the local auto parts place and purchased a new plug for my car. This one also lets the normal 7 pin plug from my boat trailer plug in. I swapped the car plug over and then headed off for Sydney. The LandCruiser towed the trailer very easily, the weight was nothing like my boat. I sat on 100 km/h all the way home, even up the steepest hills. My fuel economy was 13.4 l/100 km, only 2.2 1itres more than when I did the same trip last year with the rooftop tent.
CHANGES AND ADDITIONS
I knew from the start I would need to purchase a few things to make the new camper trailer set up the way I wanted it. The following details what I did.
Brake Controller
Probably the most important thing I needed to purchase was a brake controller to operate the electric brakes on the trailer. I found a used Tekonsha P3 Prodigy electric brake controller for sale on eBay for $127.50 delivered. It came with the wiring harness but there were other wires and things attached. I finally worked out that all the added bits were not related to the controller, but some of the wiring was utilised for the two things.
I installed the controller in the LandCruiser in early May. It took me a long time, mainly because at the same time I wanted to run an ignition source wire to the trailer in the same wiring. This is for the Redarc BCDC charger. It took me ages to find an easily accessible ignition source, so much of my time was spent working this out (hours really). I ended up using the power from the Idle Up button. However, as you will see later, this did not work.
I ran power from my auxiliary battery to the controller. I then connected the ignition power into the cable I ran to the rear compartment in the same cable as the brake output. I put this in the same location as my power cable for the car fridge (under the trim below the doors). I dropped it through the floor at the rear and connected into the trailer plug 7 pin and the 5 pin (the ignition source).
All up, it took me over four hours, but as I said, a lot of this was wasted time looking for the ignition source. However, when I took it for a test run, the brakes did not work. I had the idea that perhaps the wire for the brake lights needs to be connected, there was no explanation why this was needed.
A couple of days later I ran a wire from the trailer brake light plug to the controller (only place I could easily access the brake lights) and then tried again. It appears to work, although I only connected the trailer plug to the car and applied the brake. The controller showed a change of brake power, so I assumed I now had it working. A few weeks I took it for a test drive and sure enough, the brakes were working.
Fridge/Freezer
Although I have a nice Engel fridge, I decided I wanted a larger fridge with a freezer. I looked on Ebay, Facebook and Gumtree but found nothing in the right size and for the right price. Aldi had a model for sale at a great price, but when I measured it, I found that there was only a mm or two clearance in the height. I decided it was too close to risk.
I then decided to purchase an OzTrail 80 litre dual zone fridge/freezer from Anaconda for $769 delivered (on special for members). I get it about a week later and it fits perfectly, although I need to make something to keep it as far forward in the fridge slide as possible so the right-hand compartment will open. When I tested it, I discovered that my setting of high for battery protection caused the fridge to stop. A low setting lets it work okay.
I tested it at home by putting some water bottles in the freezer section and more in the fridge section. When I started this, the fridge was off, the water was air temperature (20C) and voltage of the batteries was 12.9 volts. I ran the fridge off the batteries and after 48 hours the fridge/freezer was still -12C for the freezer and the fridge was 3C. However, the voltage was only 12.15 volts. Considering I started with warm water, a warm fridge and lots of things to cool, I think this was pretty good.
I charged the battery up and then tested again. This time the fridge was already full (well partly full) with cold and frozen items. I ran it for 48 hours and the battery had only dropped to 12.5 volts.
A big problem arose when I went on my first test trip. When the camper trailer was set up, I discovered that I could not open the right-hand section of the fridge as it hit one of the latches for holding the lid shut. Luckily I had all my items in the other part of the fridge.
Once home, I tried to work out how to solve this problem. In the end, I removed the latch from where it was mounted and placed it on the top of the roof. I then obtained a longer screw and loop section and heated and bent it so the loop end was at right-angles and could connect to the latch. I then ground the latch down a little to enable the loop to fit over the latch. This has solved the problem.
I also cut some plastic I had to create some blocks to hold the fridge in place so it does not slide around too much.
Inverter
The trailer was owned by an electrician who added some 240 volt power points on the outside and inside. These only connect to caravan park power. It seems there was an inverter installed at one time because I found the manual for one. As I intend to camp off grid for 95% of the time, I need an inverter (even though the LandCruiser has one built in). I purchased a iTechworld 400 Watt 12v Pure Sine Wave invertor from iTechworld for $137 delivered. It took about five days to arrive from Perth.
Mattress Topper
One of the weaknesses of the Dominator is its mattress which is very thin which means you end up almost on the hard floor. People either buy a new mattress or add a mattress topper. There are a few Facebook groups for Black Series camper trailers and many people recommended the Tontine Comfortech Memory Topper. I purchased from Spotlight for $120 delivered as none of their shops near me had one in stock. It came within two days. I put this on and tested the bed, much nicer.
Diesel Heater
I purchased a portable one from Ebay. The cost was $130 delivered. I had to add an Anderson plug to the power cable as it had nothing on the end. I tested it when it came (only three days to be delivered) and despite "Chinglish" instructions, I got it going. I ended up buying some PVC pipe and caps to use to run the hot air into the camper. The heater I purchased had four outlets, so I put the caps over three (using heat resistant silicone tape) in between. I then used a one metre length of PVC to run from the flexible hose that came with the heater. Then I used the other flexible section to bend into the door of the camper, with another section to run into the inside. However, the heater continually overheated, so I had to change this.
In the end, I purchased some flexible aluminium foil piping (from Bunnings) that fits over the four outlets and can be easily manipulated to run into the tent section of the camper. It now runs for at least 75 minutes without overheating.
I also worked out how the start and end timer worked!
Battery Charger
There was no battery charger to charge from 240 volt power. I purchased a KickAss 12V 20Amp Deep Cycle Smart Battery Charger, 8 Stage Automatic for $160 delivered from Australian Direct. It arrived in about three days. This is a great charger and I can connect it via an Anderson plug at the read of the car.
I replaced it in late 2024 with another Kickass charger as I replaced the batteries with lithium ones. See later. I will use the first one with my boat and car now.
240 Volt Power Cable
I purchased a 15 amp power cable and a 10 amp adapter at the caravan and camping show for $40.
Drinking Water Hose
I purchased a food quality hose at the show for $22 for 11 metres. I later made up a small piece with an on/off valve so I could control water flow at the end of the hose. This will also fit on the tap outlet under the water tank so I can fill up things without using the water pump.
The water tank is about 140 to 150 litres. It has an outlet at the bottom back right with a tap. I broke this when I tried to open it. I replaced with a brass one from Bunnings. I then added a normal tap connection to it (see above paragraph).
Car Anderson Plug
I already had an Anderson plug on my LandCruiser (which I use for powering the 4WD winch on my boat trailer). However, this cable was inside and is a 150 amp connector. I made a 150 to 50 adapter cable as the trailer has a 50 amp connector. I then pulled the 150 connector apart and pulled it back into the passenger side panel in the rear of the car. I then rerouted it through the back floor and over towards the towbar and attached it to the bumper bar.
However, when I connected the cables up, there was no increase in voltage in the trailer. I worked out I needed to connect an ignition source to the input for the existing RedArc BCDC1225 12 volt battery charger. It seems that without this, it will not let power get to the batteries (this is not at all clear).
I found an ignition source on the power up button and ran to the rear of the car. I then connected this to the five pin plug and then reconnected the wire on the trailer side (it was not connected). However, this did not work. Later I found that the 12 volt was not getting through to the trailer plug, no idea why as it was working when I originally put it in.
The solar panel is also connected to this charger. The solar and the car go via a relay, so it can run off either once working properly. The solar is working correctly. Finally, after a lot or testing and work, I figured it all out. The manual is hopeless in the explanation of how it works. The simple fact is, if you want to have both solar and the car inputting into the batteries, then you need to have an ignition source connected. If you just have a constant 12 volt connection to this lead, then the solar will not work but the car charging will.
I ended up buying a fuse piggyback plug and then found an unused fuse spot in the engine compartment fuse box that only provides power when the ignition is on. There are quite a few of these. I then rain a wire across to the driver's side and into the passenger compartment and connected it to the original wire I put in. Now I have it all going okay. Email me if you have a problem.
Hot Water Heater and Shower
The camper came with a hot water heater/shower. I tested it and it worked perfectly once I worked it out. The previous owner used to hang the shower from the boat rack and move a gas bottle from the storage area and connect this to the heater. The water connects from the water outlet for the sink. I decided to change this setup a little, so I ordered a three metre long bayonet fitting gas hose from a firm for $52 delivered. This means I can now connect the heater to the gas outlet used by the stove. On my first trip it worked perfectly (I also marked with a black marker the settings for the three dials to get the right temperature)
Gas Bottles
The standard camper comes with two 9 kilogram gas bottles. Way more than would ever be needed. When I had my yacht, we had two 4.5 kg bottles and they lasted six weeks each when used for every meal. Since I will be cooking most meals on a campfire, the amount of gas I will need is a lot less. However, the shower (as you see from above) uses gas, so I will use a bit for that. Anyway, I decided that I will not need two 9 kg bottles, so I removed the one not connected into the lines leading to the stove. I also removed the holder. I now store my firewood here.
I also put my leveling ramps in this area as well as a bucket on the top of the remaining gas bottle.
Towbar and Hitch
The original hitch on the Dominator is a Poly Block Coupling. This is a real pain in the arse system. You have to very accurately line up the towbar part with the trailer coupling, not only in direction, but height. A millimetre or two off, and you have to move the car or move the trailer. The trailer is not easy to move at all, especially by yourself. It is almost impossible to move forward and aft, especially if you need to have the wheels chocked.
In September 2022 I purchased a McHitch Automatic Trailer Coupler. This replaces the part on the towbar as well as the hitch. The cost was $325 on eBay. It was very easy to fit, bolts removed from the old one and bolt the new one on. First go I lined it up and connected! So much easier. Well worth the cost.
Opening and Closing
It is much easier to open and close when there are two of you, but a single person has more difficulty. The following is the way I do it.
Once you have undone the clips holding the boat rack and the roof closed, you need to first swing the boat rack out of the way. This is difficult unless you use something to help you. I use a piece of PVC pipe and push the rack up till it reaches a height where it will open by itself.
Then, you need to connect the front winch strap to the loop at the rear and again, lift the rear and use the PVC pipe to push it up a bit. Then, you can winch the lid open easily. Another hint, count how many turns of the winch you need to get enough strap to reach the rear loop. Write this down somewhere near the winch and also put an X on the strap. Makes it much simpler.
Closing is similar to opening. Push the front up with the PVC pipe and then winch it closed. However, when you get it to nearly vertical, stop and push all the canvas inside so that when the lid closes, it will not catch the canvas. Another hint, you may need to remove the doona from the bed before closing the camper trailer.
Finally, to get the lid to close you may need to use a bit of force to get it down enough. I purchased a ratchet tie down strap and use this to pull the lid closer to being fully closed before refitting the clips.
Battery Upgrade
In late 2024 I saw that Kings had a special for 100 ah lithium batteries. I ended up buying two (I had already replaced the one in my Land Cruiser in 2023) for $279 each. I first used them on my Victorian Desert trip in November 2024. However, I did not have a lithium compatible DCDC charger so it did not work as it should have.
,p>
As part of the upgrade, I purchased a new Kickass DCDC charger which is lithium compatible. I installed this in December 2024 and it was a very simple matter, all I needed to do was buy a couple of new Anderson plugs to connect the wires up. Worked perfectly first go, both from the car and solar.
I also purchased a Kickass battery monitor. This was also easy to install. However, the cable to connect the screen to the shunt (which goes on the negative terminal) is not very long and does not reach to a place where I can put it outside. I have tried to get an extension cable, but they seem to be out of stock. If I cannot get one, I think I will have to buy some suitable wire and cut and splice it into the existing cable. It appears to work well.
Other bits and pieces
I purchased a few more Anderson plugs so I can connect some things up via this method rather than via a cigarette lighter or other sort of connection. See the above items for what I did. They cost $10 each from Jaycar. I had plenty of cable from other projects on my boat and car.
I also made some wooden pieces to fit under the wheel and the four legs.
I strap my shovel to the boat rack.
|  v6.00.307 © 2003-2005

